We all know that the music used in a video or film plays a significant role in determining the feel. Different songs can turn the same video from a horror scene into a comedy. If you know your audience and have found just the right song, it can elevate your video to new heights. You need to add a song to your video that fits the brand you are promoting, while at the same time connecting with the sensibilities of the audience. But picking the song is just the beginning. You still need to edit it to fit your video.
When you add audio to a video, chances are the song you picked is not the exact length of your video. Furthermore, you will need to adjust volume throughout the length of the song to accommodate for the dialog and voice-over in your video (for simplicity, I will use dialog and voice-over interchangeably. Just know that technically speaking, dialog requires two or more people speaking to one another).
What I plan to show you in this post is how to add music to your video in a way that makes it feel as if the song was made just for your video. These techniques will work regardless of what video editing software you use.
Lyrics vs Instrumentals
One decision I do want to specifically address is whether or not it’s best to use a song with lyrics or strictly use an instrumental song. It all depends. Over the nearly 20 years I’ve produced videos professionally, I’ve used both. The tricky thing with using songs that have lyrics is that the words in the song could compete with the words in the video if you have a voice-over or talking-head interviews with dialog. But the benefit of adding songs with lyrics to your video is that sometimes the music fits the mood of the video but the lyrics don’t.
The good news is that you don’t necessarily have to choose one over the other. In most cases, if there is a song with lyrics, there’s usually also an instrumental version of that song as well. Then it’s just a matter of editing the two songs so that the instrumental version is used during the parts of the video with dialog or voice-over, then switch to the version with lyrics for pacing breaks.
What to Keep in Mind When You Add Audio to Video
The bulk of what I want to cover relates to how to edit the song so that it feels like it was made just for the video. There are three things to keep in mind.
-
- The beginning: the beginning of the video and the beginning of the song should feel like a natural fit. What I mean by that is, however the song starts, its pacing should match that of the video. If the video starts slow and steady, so should your song.
- The middle: regardless of whether or not your video has a voice-over, you want to ensure that the audio levels of your soundtrack aren’t too loud. If you do have dialog or voice-over, you want to adjust the music accordingly so it doesn’t drown out or fight with the dialog (I’ll be covering this below.)
- The end: last, and certainly not least, the end of the song should ideally have some kind of beat or kicker that feels like an ending (as opposed to trailing off). I don’t want to be too strict with this suggestion. It’s not a hard and fast rule. But generally speaking, short videos that have a strong musical ending are more aesthetically pleasing than ones that just fade off.
A Quick Music Lesson
If you remember your childhood music lessons, songs are broken into phrases and “bars.” For most songs, each bar is made up of four beats. So if you’re counting the beats in a song, you’d count 1,2,3,4 (first bar); 2, 2, 3, 4 (second bar); 3, 2, 3, 4 (third bar); and 4, 2, 3,4 (fourth bar). You’ll notice that at the beginning of every 4-count, I incremented the first number. That just makes it easier to keep track of the bars as you count through them.
In most songs, four bars will make a phrase, and that’s where you’ll often see a shift in the music. There may be a bridge to a completely different sounding part of the song; or there may be a new instrument added. In either case, this is where you’ll notice some kind of change.
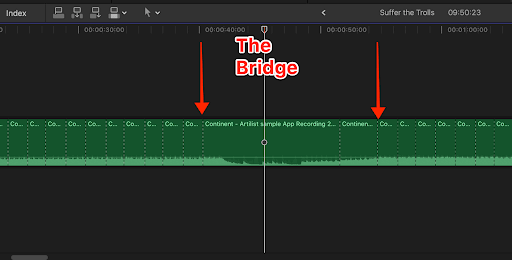
That area between the two arrows is the bridge. The song used is Continent by ANBR.
The reason I mention all of this is that we’ll use this information later when making decisions on where to cut the music. If you want to get an excellent primer on music timing, I recommend this video. The video is aimed at aspiring music DJs, but all the concepts he’s teaching are applicable to editing (e.g. instead of doing a DJ music drop “on the 1,” you may cut your video on the 1, etc.)
Now that we’ve covered some music basics, let’s now see how we will apply this knowledge to make a better edit.
Editing the Song to Fit the Video
Let’s address the specific ways you can make your chosen song fit the video, regardless of the length of either.
Adjusting the Length
Perhaps the most challenging job will involve changing the length of the song to match the video. Unless you are specifically making a 30- or 60-second TV spot or web promo, where there are already cut-down versions of a song for those popular lengths, you will have to do some creative editing to make the song fit. This is where our music knowledge comes in handy.
There are two ways you can approach the addition of music. The first is to edit all the dialog and sound effects (if applicable). In my opinion, whenever editing a video based on interviews or a VO script, it’s always best to edit all the VO down first, so that you have a foundation for the full video. Remember, it’s the information in the video that people need.
Assuming you have chosen your song, you will then lay down the music track beneath. This is where you will begin moving the video and audio clips around to match with the music. As much as possible, you want the audio (and to some extent, some of the visuals) to fit within the bars and phrases of the song. That means doing things like:
- Cutting “on the 1”
- Having groups of similar visual elements all fit within a phase—e.g. during the first two bars you may show b-roll in the office, then during the next bar (four beats) you’ll show a talking head; then on the next bar you cut to more b-roll, etc.
- Using fades and transitions that match the rhythm of the song
Most importantly, you want the end of the song and video to be synched in such a way that any final downbeat of the song comes after all the dialog. This is where you may need to either cut out a large chunk (or chunks) of the song, or you may need to loop some parts to make it longer.
As you’ve probably already determined, the place where you cut the song (either to take a section out or to loop a section) will be right before the “1” beat, ideally after a full phrase. The reason is that subconsciously, we’re used to hearing music in phrases (groups of four and eight bars at a time). Whenever you cut a song in the middle of a phrase, it “feels” off. I’m sure you’ve noticed it whenever a music station plays a shorter version of a song, and they’ve done a poor job at cutting it down. The same thing goes if you loop part of a song to make it longer. As much as possible, loop an entire phrase (eight bars), or half a phrase (four bars).
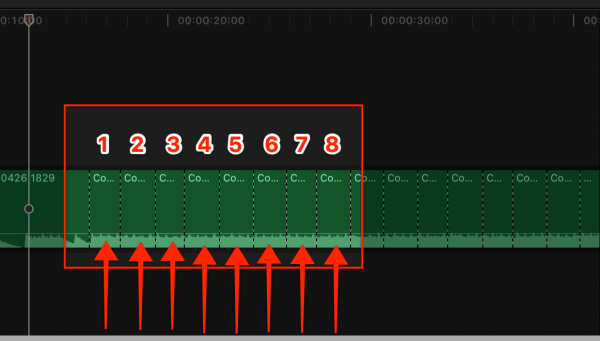
In the image above, each of the eight sections represents a bar (four beats.) All eight bars represent a phrase. This particular song is comprised of four phrases separated by a bridge in the middle (see above). It would be very easy to loop this song by copying and pasting either these first four bars or the whole phrase. The first phase starts at about the 19-second mark and goes to about the 32-second mark. At that point, you’ll notice a new string instrument is introduced.
What I like to do is make cuts in the music ahead of time, adding a slice at every bar or phrase. This is where it comes in handy to know the key commands for your respective NLE. I edit in Final Cut Pro X, and the key commands to make a cut is CMD-B. So all I do is let the music play, keeping my finger on the CMD key. Then every time the music hits the “1” at the end of a bar (or phrase) I tap the B key (keeping CMD pressed) to make the cut. I then do this throughout the entire song. Sometimes I need to tweak a few of the cuts if they’re off by a beat. But for the most part, this gives me a nicely cut song.
You’ll notice in the video above each of the dotted lines represents where I hit CMD-B to make a cut. It will now be easy for me to grat chunks of the song to copy and paste where needed to extend the song or cut out to shorten it.
For the most part, as long as I can connect the beginning and end of phrases, the music should flow naturally. One caveat is that sometimes, there are transitional beats joining to song phrases that might not cut well together. For instance, let’s say a song has eight phrases (i.e. 16 bars of four beats/bar). And let’s say you want to cut out the two middle phrases (phrases 4 and 5). The end of phrase 3 might not cut perfectly with the beginning of phrase 6. Sometimes songs will have an additional instrument added later that is not in the beginning. So phrases 5 – 8 might have a kick drum whereas phrases 1- 4 don’t. When you attempt to connect phrases 3 and 6, the kick drum in phrase 6 may sound awkward coming in from phrase 3. My recommendation for such a situation is to make sure that part of the song is underneath the dialog. If it’s not too drastic a change, it will most likely be unnoticeable.
Pacing the Song
Once the song is the appropriate length, you can start moving the dialog to match up with the parts of the song that will allow your video to “breathe.” What I mean by that is this: give your video spaces and pauses, if possible. Instead of having dialog all the way from beginning to end, inject breaks in the dialog that allow for the music to come through. There are four main reasons to do this:
- Pacing: a nicely paced video is more enjoyable to watch. Think about a roller coaster that has big dips and long climbs. Imagine if you rode a coaster that was just one drop after another. The excitement of the drop is gone if there was no build-up for each drop.
- Let a point sink in: someone may make a point in your video that you want the viewer to ponder for a few beats. Maybe it’s some important information you want them to remember. Or it could be a sad part of a video raising money for baby seals, and you want to give people time to get emotional and cry. Or maybe it’s a funny joke and you want to give them time to laugh.
- Let the song shine: sometimes you just want the song to play through because the lyrics are intriguing and fit the theme of the video. Or maybe the beat and melody are emotional, and you want to kick up the volume.
- Big finish: lastly, hopefully, you picked a song that has a strong ending to add to your video. Obviously, the term “strong ending” is subjective. But typically, it’s something like a crescendo that builds up towards the end then ends with a hard beat drop.
Whatever the reason, it’s always a good idea, whenever possible, to have a video paced well with appropriate places for the music to shine.
Mixing Vocal and Instrumental Versions
Earlier I mentioned that there are times when you may want to use both versions of a song—one with vocals and one without. This is best done when you’ve added to your video a song with lyrics that relate to the theme. Using the methods I described above, all you have to do is lay both versions down making sure the two songs are in sync. Then cut the sections of the song that have lyrics and replace them with the corresponding section in the instrumental version.
Melding the Cuts
The last technique I want to share is quick and simple. It’s a trick I learned almost twenty years ago for quickly ducking audio or connecting two audio clips.
Ducking and Boosting Audio
If you’re using a track-based NLE, the intuitive way to adjust the level of music to allow the dialog to be heard is to use four keyframes:
- The first one placed where you want the music to start lowering/raising
- The second one set to the new lower/higher audio level
- The third one set where you want the music to start raising/lowering
- And the fourth one where the music returns to the previous level
The trick I learned years ago that makes this process much simpler is to cut the audio at the places where you want the music to change, then add a crossfade.
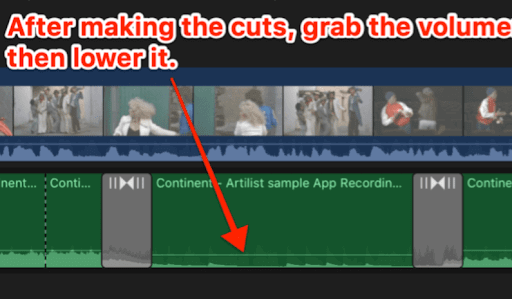
As a Final Cut Pro X user, I don’t do either of those anymore. In FCP X, all you have to do is highlight the area of the audio where you want the audio to change. This will create audio grab handles that you can then adjust upward or downward. As you do this, the keyframes are automatically created.
What Tips Do You Have?
Lastly, I want to say that there is no right or wrong way to edit music to fit your video. Much of it is subjective in terms of what people find pleasing. And there are many different ways to do the things I mentioned above. We want to hear from you. What tips do you have for adding music to your videos?