Highlights
Table of Contents
Explore article topics
Updated December 2021
Time is money for professional video editors, and performance issues like lagging video and dropped frames while editing video can absorb a lot of time and mess up your post-production workflow. DaVinci Resolve, like any other video editing software, is very resource-intensive. To make it worse, most video is filmed in high resolutions of at least 4K these days, often with video codecs like H.264 and H.265 that are not optimal for editing.
Unfortunately, the high resource requirements of video editing can make even the best editing workstation struggle without some help. Thankfully we have 7 ways you can speed up editing in DaVinci Resolve.
Upgrade your hardware
There are minimum requirements for running DaVinci Resolve on a PC or Mac, and if your system does not meet them, you are simply out of luck and will need to upgrade. Most recent computers will meet the minimum specs, but unfortunately, to get smooth playback and editing across the board with all formats and resolutions, plus working in Fusion, you will need a rather high-end system.
Upgrading to a suitable system is obviously the ideal solution to speed up DaVinci Resolve. Still, unless you’re a professional, you probably don’t have the budget for it. Even if you did, it might not solve all your problems anyway. So let’s look at some other ways to help your system cope with intensive video editing jobs.
DaVinci Resolve Free or Studio
It’s important to consider upgrading to the Studio version of DaVinci Resolve if you haven’t already. While the free version is very capable, it does not utilize your GPU fully, and some functions are limited. This is especially important if you have a powerful system with a good GPU. If you are experiencing playback performance issues like lagging video, dropped frames, or crashing, you may find a significant improvement when upgrading to the studio version. Whether you upgrade or not, the following options will still lead to significant performance improvements.
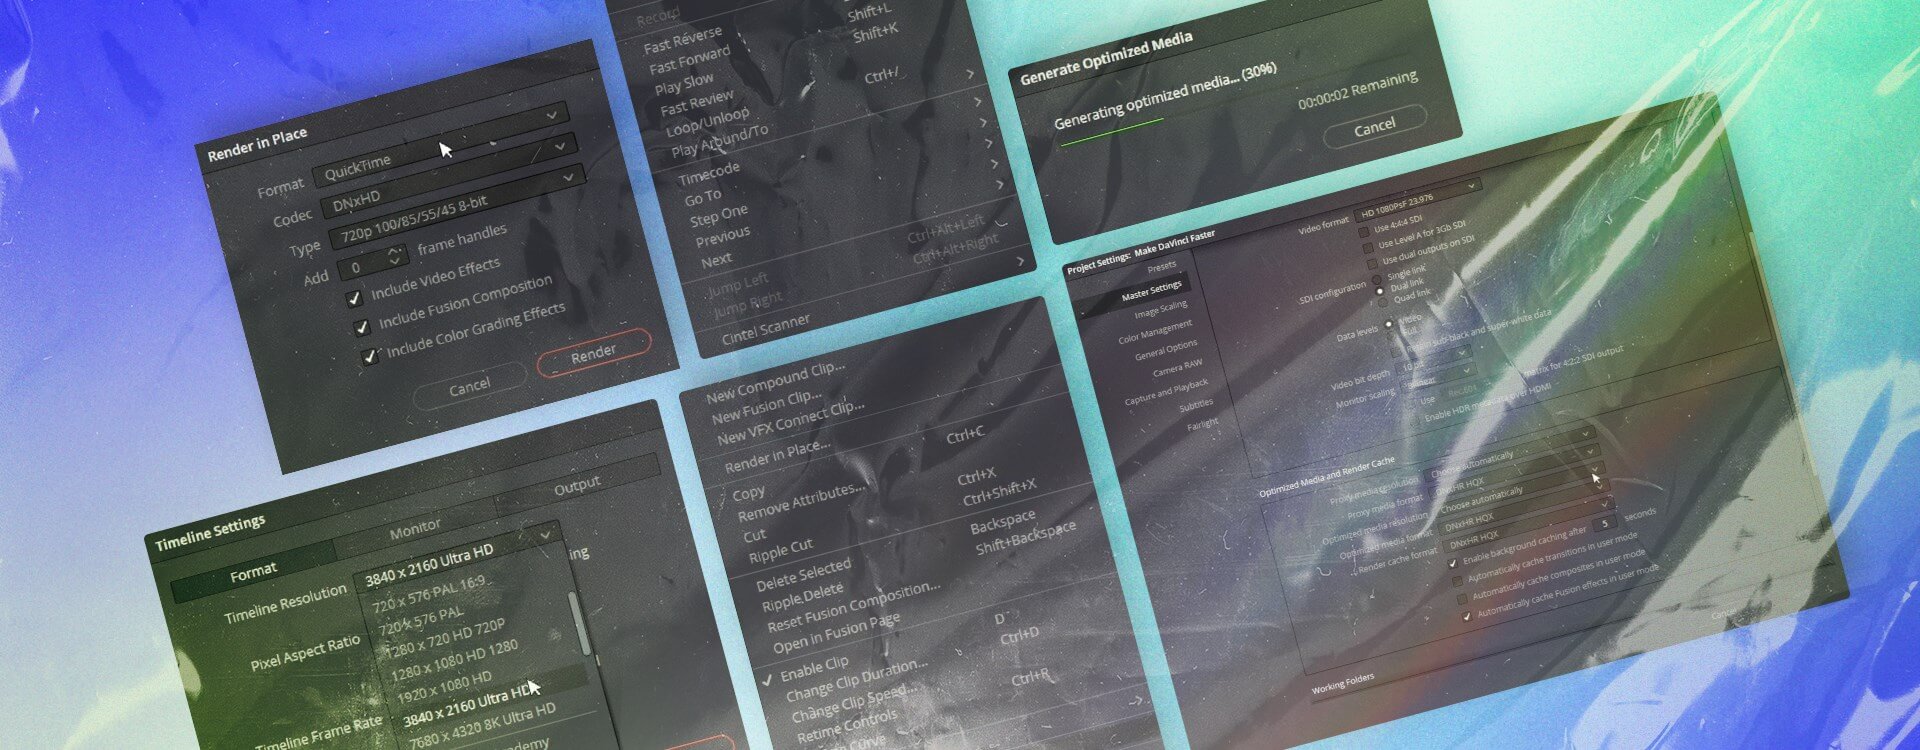
Timeline resolution
The resolution of your timeline plays a significant role in achieving smooth playback in DaVinci Resolve, specifically if you are working with footage in 4K and above.
Reducing your timeline resolution can lead to significant playback improvements during editing. There are 2 main ways to achieve this without affecting your output resolution.
1. Timeline proxy mode
This is the simplest method and has no effect on your actual timeline; it simply affects what you see in the viewer. Just choose timeline proxy mode (half/quarter resolution) from the Playback menu. The playback resolution of your timeline will be reduced in the viewer, but it has no effect on the actual timeline. This method can offer some reasonable performance gains. However, effects are still processed at timeline resolution, so this will not be sped up.
2. Change the actual timeline resolution
Right-click on your timeline in the media pool and change to custom settings for your timeline, then lower the resolution to 1080 HD and save.
With this method, you change the timeline’s actual resolution, which also affects effects and transitions, titles, etc. This can result in a decent improvement. The caveat is that you need to remember to change it back to the correct resolution before exporting and clear your render cache if you want to output to a higher resolution. There is also some potential for issues with scaling for Fusion clips, but it is not something I have experienced yet. However, use this method with caution.
Render cache
When the render cache is set to Smart, DaVinci Resolve will render effects and clips that require rendering to improve playback performance. It will do so in the background whenever the software is idle and during playback. Render progress is displayed with a red bar on the timeline that turns blue for sections that are rendered. Once rendered, playback should be smooth. You can also render Fusion or color correction outputs for specific clips by right-clicking on the clip in the timeline and selecting the relevant option.
Optimized media
DaVinci Resolve can automatically generate media optimized for video editing and then dynamically switch between the original and optimized media as required by the software and ensure the original media is used for final renders.
Optimized media can be created in the Media Page, Media Pool, or Timeline with multiple or individual clips by right-clicking and choosing to generate optimized media. To select the file type and quality for your optimized media, you can set this in the project settings under Master Settings.
Optimized media is a great way to speed up your workflow, but it takes time to create these files, and hours in the case of large projects. It’s an excellent option if you can leave it overnight, but otherwise, it can be problematic. Sometimes optimized media or proxies are simply the only options.
Proxies
Proxies function in much the same way as optimized media. The difference is that they are essentially full copies of the original media that can be shared around easily between editors, for example. The other difference is that switching between proxies and original media is somewhat manual, although Resolve does make it easy for the proxies it generates. Proxies are a relatively standard way of dealing with high-resolution files and are commonplace industry-wide. Like optimized media, these take time and drive space to create but make up for it in time saved during the edit.
Get unlimited high-quality music for your videos
Render in place
Some clips that are heavily laden with effects or color grading can be particularly difficult to playback, even with proxies or optimized media, as the effects are applied afterward. Color grading is often done on original clips as well. So if you have a clip that continually challenges your system but is essentially finished, you can render it in place (right click>Render in Place). This renders the clip with all its effects and grading as a single clip that you can save. You can choose the codec and resolution of the render file and save it. It’s a handy feature to deal with troublesome clips.
Common issues
While performance issues are part of life as a video editor, and these fixes above will be valuable, here are 3 things to check before you blame a slow system.
1. Drivers and updates
Ensure you have the latest drivers and other updates required by your system. It’s common for problems to be associated with out-of-date drivers, especially GPU drivers. Updates for DaVinci Resolve often include performance improvements, so it is worth a try as long as you aren’t in the middle of a big project. That is never a good time for significant updates.
2. Disk speeds
It’s easy to upgrade and upgrade your workstation without seeing a significant improvement, and disk speeds are often overlooked when it comes to upgrading your system. So you’d be surprised just how many performance improvements you will get editing and rendering off SSD or, even better, NvMe M.2 SSDs. These drives are much faster than traditional drives and much more capable of dealing with the high data rates required for high-resolution files.
3. Fusion
Editing and color grading in DaVinci Resolve is certainly resource-intensive, but once you enter into the world of Fusion, it will take every bit of system resource you have. Visual effects require a lot of processing power, and there is not much you can do about it. Upgrade your memory and GPU. That will go some way to solving your problems.
Final thoughts
Video editing, color grading, and visual effects can be tough on even the best of computers, but DaVinci Resolve offers several software solutions to help out your system if you cannot upgrade it. So use your render cache, lower your timeline resolution, create optimized media or proxies, and render the tough clips in place. These solutions will help speed up your editing in DaVinci Resolve.
Johan Kok is passionate about visual story telling and loves the outdoors. He runs his own small video production business in Auckland, New Zealand doing mostly corporate and event work. When he has time he gets involved in local short films and other productions as well as running a small outdoor YouTube channel on the side.
Share this article
Did you find this article useful?
Related Posts
- By Artlist
- 5 MIN READ
Latest Posts
- 25 Apr
- By Josh Edwards
- 4 MIN READ