For a while, the YouTube video editor has been thought of as nothing more than a ‘simple’ editing tool built into the platform where you can perform some basic editing practices such as splicing and removing sections, adding blurs to your imagery and replacing copyrighted music. They’re all useful things, but it never felt like you could ‘do everything’, and more often than not, it’s been overlooked.
It was primarily designed as a place for ‘quick edits’ that could help save you time, compared to if you had to go back to your editing software, make the tweaks, re-export and re-upload.
However, in recent months, the YouTube editor has actually changed quite a bit. Nowadays, there’s a lot more to it. We’d go as far as saying it’s plausible that you can edit a whole YouTube video just by using the YouTube video editor! Below, we’ve broken down everything you need to know about how to edit a video on YouTube.
Finding the YouTube editor
First things first, let’s find the free YouTube video editor.
- When logged in, head to your YouTube Channel homepage and click MANAGE VIDEOS. This will take you through to the YouTube Studio dashboard.
- On the left-hand drop-down menu, select Content. This will bring up all of your uploaded YouTube videos, whether they are public, unlisted or private.
- Identify the video you wish to edit on the YouTube video editor and select the pencil icon. This will take you through to the Video details page for that specific video.
- On the left-hand drop-down menu, select Editor. This opens up the free YouTube video editor.
Note – alternatively, you can click the Edit video button when logged in and viewing one of your videos. This will take you through the same process as described above.
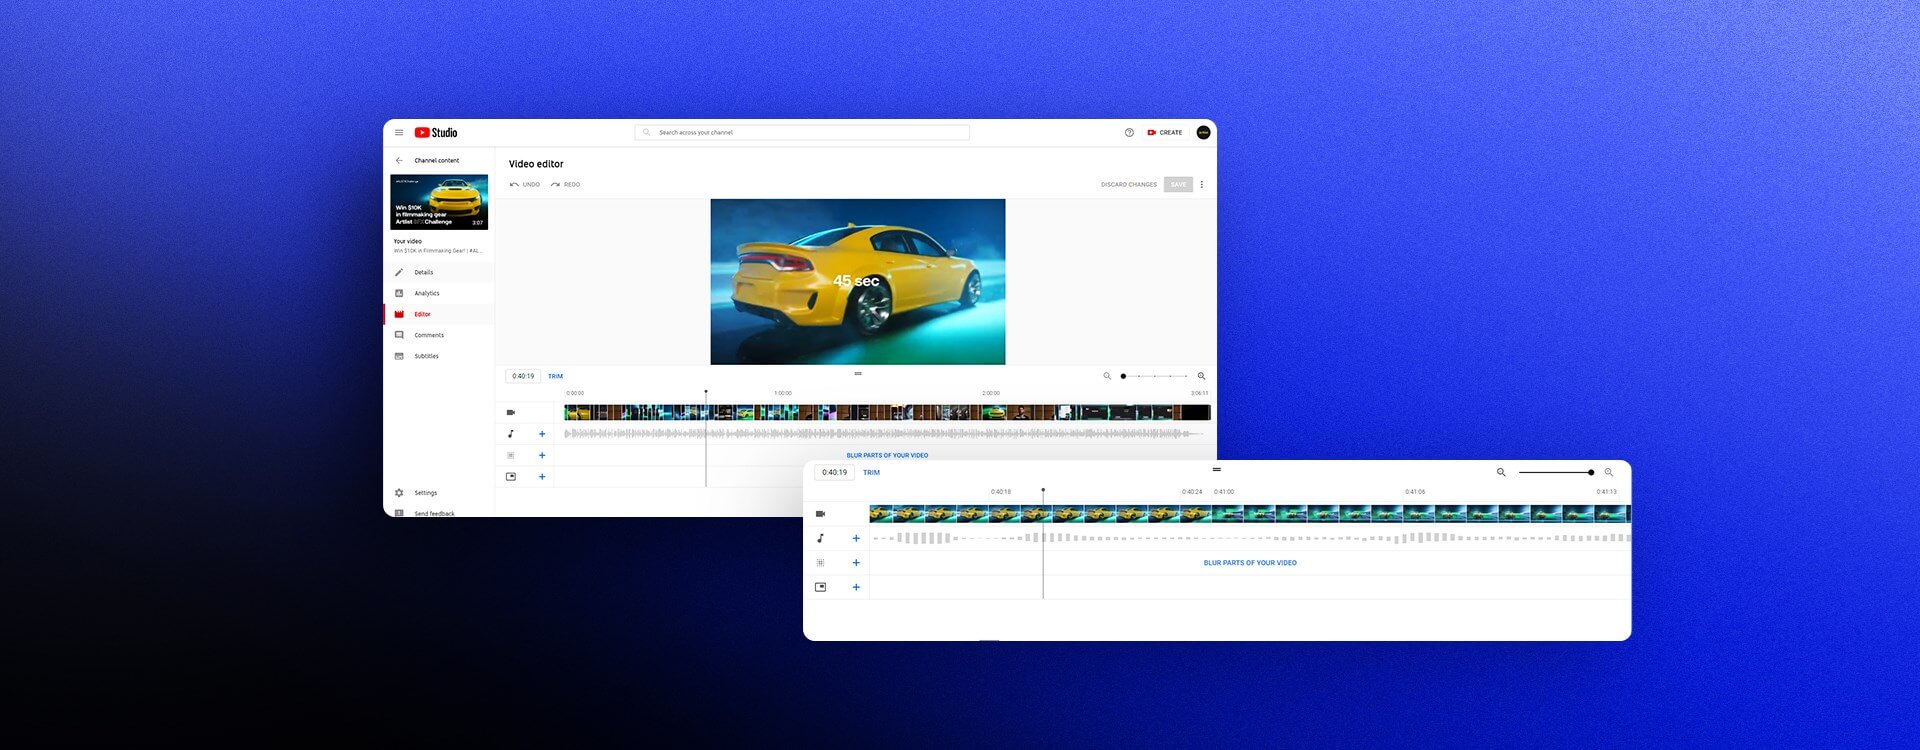
Getting to know the interface
Once you’re on the YouTube editor, you’ll be presented with this layout. We’ve numbered and labeled everything for you accordingly.
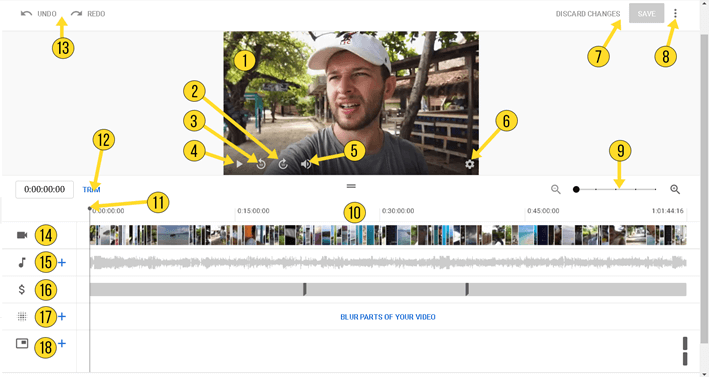
1 – Playback area. This is where you can watch your YouTube video.
2 – Fast forward the video 10 seconds.
3 – Rewind the video 10 seconds.
4 – Play/pause.
5 – Mute and control volume levels of the video.
6 – Video playback settings. You can choose to play the video at normal speed or opt for faster and slower playback speeds.
7 – Discard and save changes.
8 – Further options, including keyboard shortcuts and saving your edit as a completely new video.
9 – Zoom in and out of the timeline.
10 – The editing timeline. This is very similar to software you use, such as Adobe Premiere Pro and Final Cut.
11 – The playback head. It indicates where you are on the timeline/which part of the video you are playing through.
12 – The trim button. Utilizing this, you can splice your video and remove sections.
13 – The undo/redo buttons if you make a mistake.
14 – Video track. This where your footage is lined up and displayed.
15 – Audio track (you can add extra tracks here). This is where your audio is lined up and displayed.
16 – Ad breaks track. Choose when and where you want in-video ads to play.
17 – Blur track. Add blurring to certain parts of your video (useful for hiding details like phone numbers and number plates).
18 – End screen track. You can create and add elements to the end screen that appears at the end of your YouTube video.
Trimming your video
Firstly, when it comes to how to edit a video on YouTube, you’ll want to know how to utilize the trim tool. We trim a video when we’re looking to change the start or endpoint of a video or if we’d like to cut out a section in the middle. The YouTube video editor has made this really easy.
1. Select the Trim button above your timeline. The timeline should now be selected in blue. You’ll also notice a new Options box below the YouTube video editor with the options of Split, Cancel and Preview.
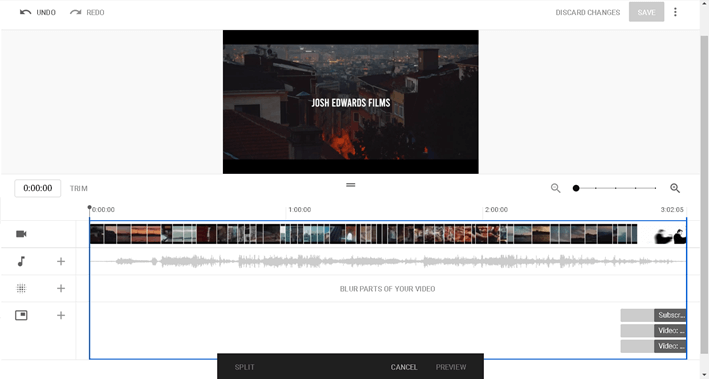
2. Using your cursor, you can drag the blue lines at either end of the video to make new start and end points.
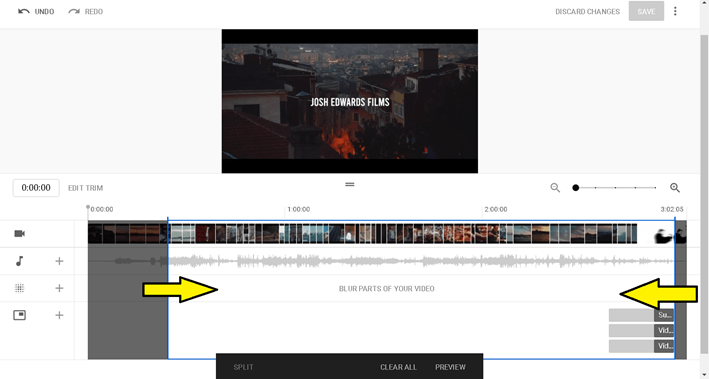
3. If you want to cut out a section in the middle of your video, click on the timeline from where you want to begin the cut. Use the playback video and zoom tools to identify the exact section you want the cut to begin. When you’re happy with where the playhead is placed, click Split in the box at the bottom of the YouTube editor. A blue line will appear.

4. Next, drag the blue line to where you would like the cut to finish. The greyed-out area between the two blue lines represents the section of the video you have no cut out. You can make multiple cuts throughout your video. If you want to remove a split, simply click the X icon above the relevant section.
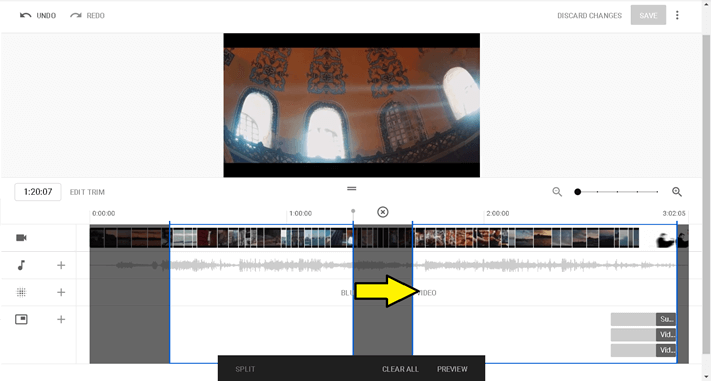
5. Once you’re happy with your edit, you’ll need to hit Preview in the options box at the bottom of the YouTube video editor before you can hit save.
That’s the basics of trimming and how to edit on YouTube! It’s important to remember that, unfortunately, you can’t pick up footage or add in extra clips and move them around. The YouTube video editor is purely designed for trimming down existing footage. Perhaps, sometime in the future, YouTube will be adding these features to the editor.
Ad breaks
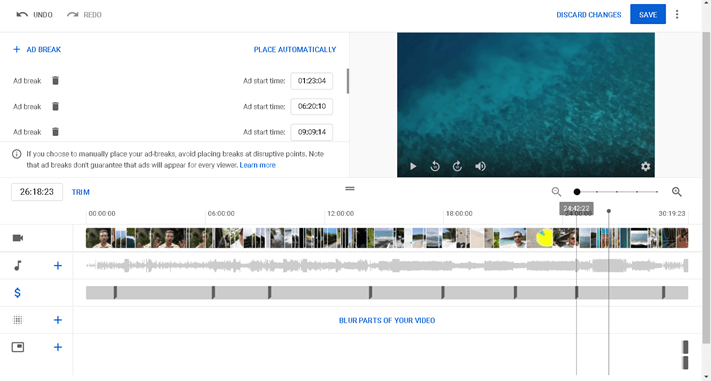
When it comes to how to edit a video on YouTube, you’ll also want to know how to insert ad breaks if your channel is being monetized.
To do this, select the ad break track on your timeline. You’ll see where YouTube has already automatically placed ad breaks. They’re represented by the grey ‘bars’ on the timeline. You can drag and move these around on the timeline. In the top-left of the YouTube editor, you can also choose to delete these ad breaks, add more, or allow Youtube to place them automatically.
End screens
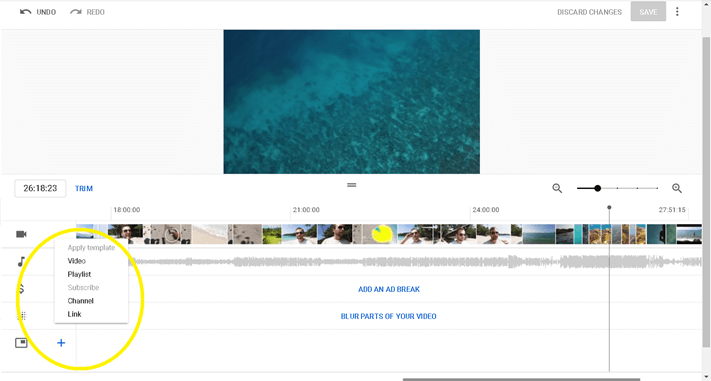
Next, let’s take a look at end screens. On the bottom track of your timeline, you’ll see the + icon for adding end screens. You can choose to add any of the following to:
- A pre-set template from YouTube or one that you’ve created previously
- Another YouTube video
- A YouTube playlist
- A subscribe icon
- A link to another channel
- An external website link
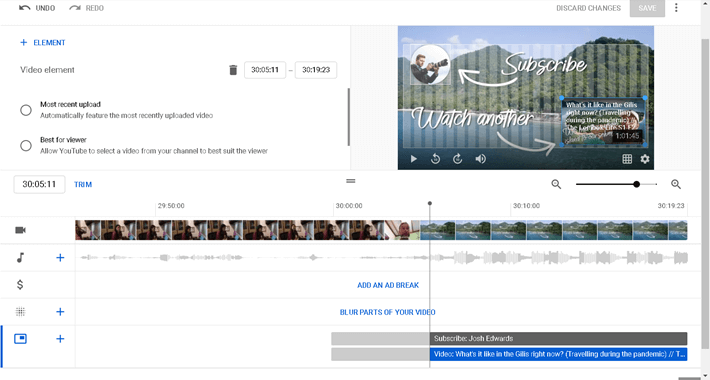
Go ahead and pick the end screen cards you’d like to feature, as well as the layout. You’ll then want to use the zoom tools to zoom in on the end of your video timeline and, using your cursor, to drag and slide and change the length of each card.
In the top-left, you’ve got the option to change video element cards to your most recent upload or let YouTube decide what’s best for the viewer.
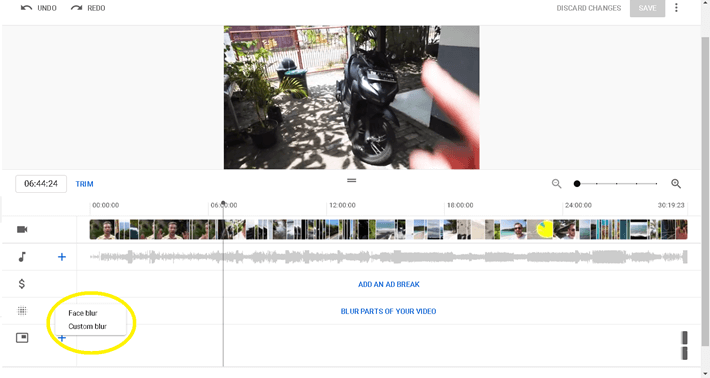
Blurring
Sometimes, we show a phone number or a number plate in our video that we don’t necessarily want the world to see without realizing it. Perhaps, someone who’s featured in your video asks you to blur their face after you’ve already uploaded it. Fortunately, the YouTube video editor allows you to add blurring to your video.
To do this, click on the + icon on the blur section of your timeline. You can either select Face blur or Custom blur.
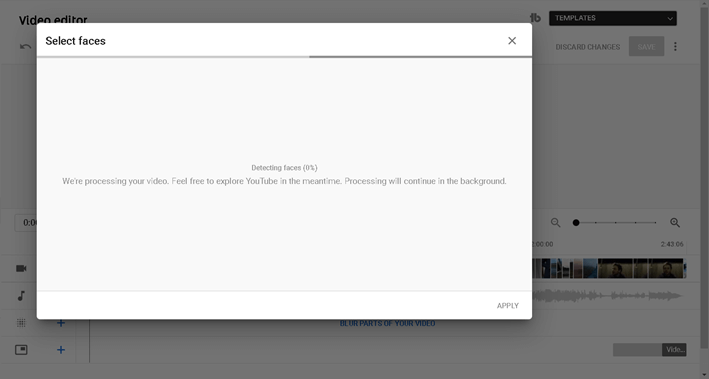
If you choose face blur, YouTube may take some time to process your video as it searches for faces automatically. This can take a while, and it’s not always 100% accurate.
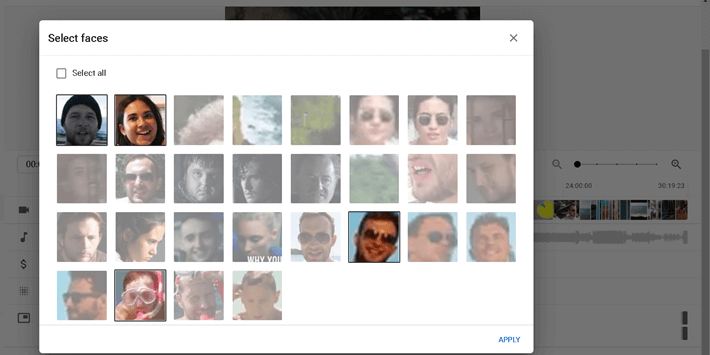
Once the processing is done, you can choose which faces you want to blur by selecting the options presented and clicking Apply.
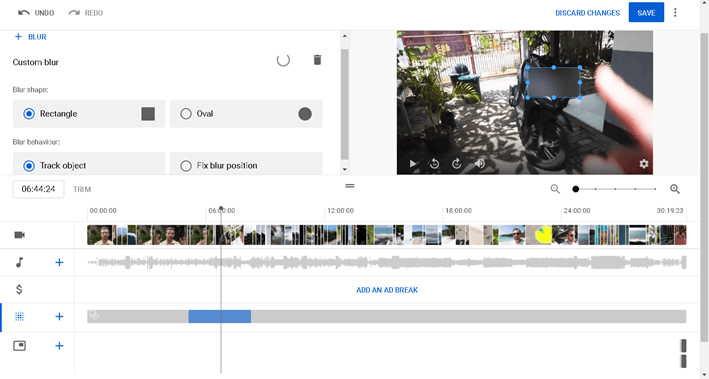
If you choose custom blur, you’ll be given a number of options in the top-left corner of the YouTube editor. These include whether you want a rectangle or an oval shape, as well as whether you’d like the blur to stay tracked to an object or fixed in its position on screen.
To the right of this, you’ll be able to use your cursor to click and drag the blur around the video, choosing its best position. You can also change the size and shape of the blur.
On the timeline below, use your cursor to click and drag the blur to the part of the video you want it in. You can also click and drag the ends to shorten and lengthen the period of the blur appearing on screen.
Wrapping up
So, that’s how to edit on YouTube! All that’s left to do now is ensure you save your changes. Click the save button in the top right, or choose the Options button on the right of the Save button with the 3 little dots. This will allow you to alternatively save your edit as a completely new video.
The free YouTube editor is a really underrated, easy-to-use tool that can help streamline the process of making tweaks and edits after you’ve uploaded. It’s very handy for beginners who are starting a YouTube channel and can be a timesaver for pros who don’t want to use their video editing software for small tweaks.