If you’ve ever shot a video and your subjects looked as if they belonged in an alien movie or have a nasty case of jaundice, or the entire thing just has an odd color cast, the chances are that your white balance was, well, unbalanced. Knowing what white balance is and how to get perfect white balance will make a world of difference to your filmmaking and keep things looking natural. Of course, there are plenty of ways to get your WB accurate, too, so your videos can always look picture-perfect.
What is white balance?
What we think of as “white light” isn’t exactly white. It’s a composite of different wavelengths of light from across the spectrum, ranging in color from red to violet. Different light sources contain varying proportions of these wavelengths, making them slightly warmer or slightly cooler, both in temperature and in color.
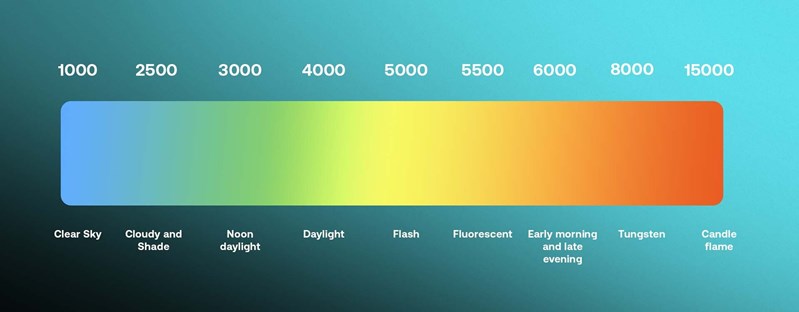
The temperature of light is measured in Kelvin. The hotter the temperature, the cooler in tone – or bluer – the light will look. If that seems counter-intuitive, remember that something white hot is hotter than something red hot.
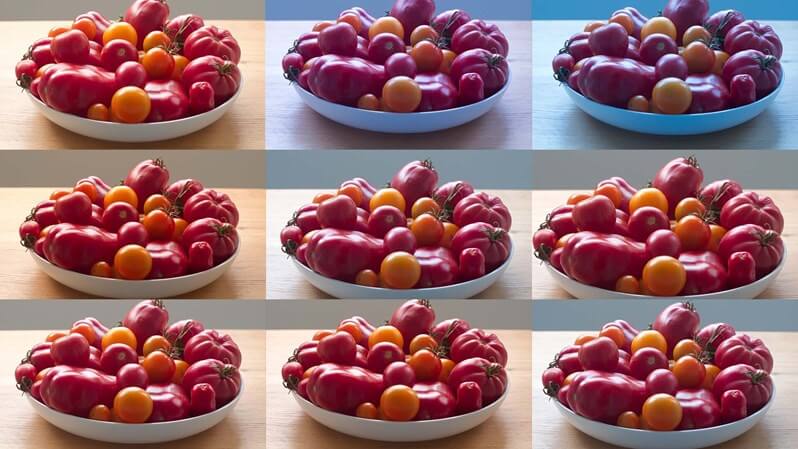
Our eyes are good at adjusting for these discrepancies in color temperature and determining what the white balance is to ensure that white really does look white and that what we see isn’t given a color cast. However, our cameras will record light as it comes. This means that you need to adjust the white balance of a scene to ensure that white renders as white and our images or footage do not appear overwhelmingly blue or orange. You can do this in the settings of our cameras or in post-production.
What affects your white balance?
Whatever you’re shooting, it’s best to get your white balance right by adjusting your camera’s white balance settings. You can alter the white balance in post-production, but in-camera is best. However, to get the white balance right, it’s crucial to know and understand the light temperature where you are shooting, whether you’re shooting in natural light or other types of ambient light or using strobes in a studio.
Light temperature varies depending on the light source, and if that source is the sun, on the time of day.
* For Blackmagic Pocket Cinema camera owners who have been struggling with the “blue tint” on their monitors that made colors look off even when they weren’t, the latest Blackmagic Design Pocket Camera update should help to fix this issue.
How to white balance a camera
If you wanted to, you could rely on your camera’s auto-white balance to judge the light temperature where you’re shooting. This can be helpful in fast-moving situations where making lots of adjustments and preparations can handicap you. Of course, you can always correct it in post-processing, too. It’s probably best not to rely on auto white balancing, though, as it can include some oddities. For example, if you’re trying infrared videography and do it with auto white balance settings, your image can come out looking mostly red.
Most cameras also come with white balance preset options that work for a range of shooting conditions. You can go into settings and select your white balance for daylight, shade, cloudy, tungsten, fluorescent and flash lighting. When you have a scene with mixed lighting, it’s best to use a custom white balance setting, but if you prefer to use a pre-set, set the white balance for the light falling on your subject.
If you know the exact temperatures of your lights, for example if you are using 3-point lighting, you can also choose a specific Kelvin setting. Remember: if you’re using multiple lights, they should all be set to the same temperature. Or, you can make a custom setting using a white balance or grey card.
How to use a white balance card or grey card
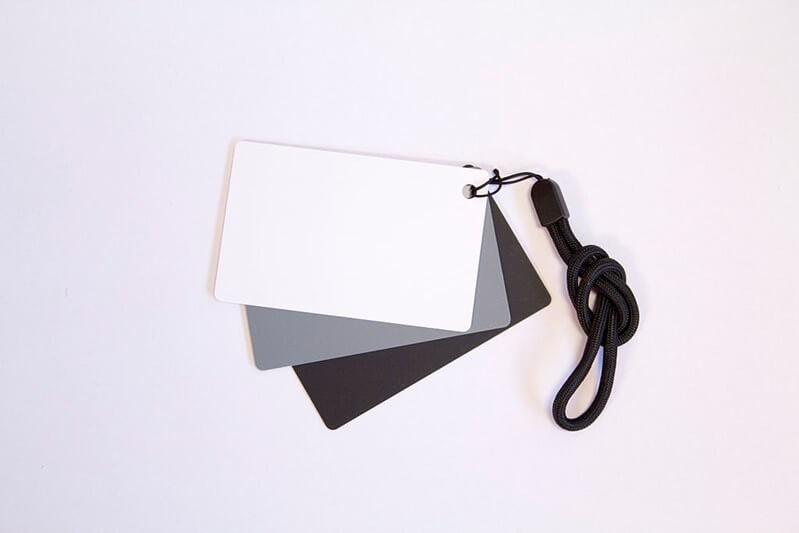
Image by Katie Chan (CC BY-SA 3.0)
A custom white balance setting is always going to be the most accurate choice, but it is definitely best if your light is mixed. For example, you’re filming at night with street lights with different temperatures, or your YouTube lighting involves a mix of natural and ambient lights.
Making a custom white balance setting will vary in process from camera to camera, but the principles are the same. To do this accurately, you will need a white balance card or grey card. These are calibrated targets that are either spectrally neutral or 18% grey so that your camera has a reference. In a pinch, you can use a white piece of paper or wall, but they aren’t always the perfect color white.
Here’s how to do it:
- Select the custom white balance setting in your camera’s menu.
- Photograph or shoot your white balance card or grey card so that it fills most of the viewfinder or screen – do this under the lighting conditions where you will be shooting.
- Allow the camera to lock onto the settings or import the data into the custom white balance setting.
- Remember to reset your custom white balance setting if and when the lighting conditions change.
Adjusting white balance in post
Even if you set your white balance in camera, checking and tweaking it in post-production should be the first step in the color correction process of your footage. Most video editing software give you the ability to adjust your white balance in post-production. Often, you will do this using an “eye-dropper” tool. You can select an area that should be white, and the software will correct the white balance. Or you can sample an area that is white or neutral grey and use that as the baseline for making adjustments. If you want, you can fine-tune your white balance using the color wheel or the temperature and tint sliders. The temperature slider controls warmth, from blue to red, and the tint slider adjusts the magentas and greens.
A quick note on white balance for smartphone cameras
High-end smartphones will allow you to adjust your white balance settings, which will give your videos a much more professional finish and is great if you’re working with smartphone video accessories such as lights and filters. It’s also worth spending some time editing your footage, even if you did manage to adjust your white balance and especially if you couldn’t.
That’s a wrap
Getting your white balance right makes a significant difference to the appearance of your work. And even if you’re going to be video color grading to give your project a specific look or feel, getting the white balance right will help produce a consistent finish. If the white balance is off, people notice very quickly. But there are plenty of ways to accommodate varying light temperatures and ensure that white really does look white.