
The use of voice-over in film and video is far-reaching, both in its creative application and practical use. This may come as bad news to those of you who find the experience of listening to your own recorded voice unpleasant or even surreal, as many do. In fact, the phenomenon is so common it has earned its own name – voice confrontation!
But the good news is that if you can overcome your own voice confrontation and figure out how to write, record and edit good voice-over, your videos could benefit from it in a big way. In this article, we’ll be looking at 3 main things:
- What is voice-over?
- When to use it (as well as when not to)
- Most importantly, how to produce high-quality voice-over without breaking the bank.
What voice-over is and when to use it
While the concept of voice-over is likely familiar to most of us, defining it and looking at examples could be a good way to get inspiration for your own voice-over projects. Voice-over refers to the use of recorded speech placed over associated visuals but without including visuals of the speaker. So then, it is typically a separate audio asset that you incorporate into your video that is recorded with an emphasis on audio quality. This is as opposed to occasions where you might extract dialogue from a video clip to use over other footage, such as when performing split edits (J-cuts or L-cuts).
So in what instances might you expect to find voice-over? Perhaps its most iconic use, though which has admittedly become dated, is in trailer narration. Most famously of all must be the “in a world…” genre of trailers of the 1980s-2000s, voiced by the now legendary Don LaFontaine.
This specific approach to editing trailers is now considered a little corny, and these days is only really used ironically. However, it still demonstrates the crucial voice-over principle, which can be applied in contemporary work to great effect. This is the principle of communicating a lot of information without boring the audience and adding more drama and interest to what is seen. If not in trailer narration, you will certainly find voice-over used for this purpose elsewhere.
Still within the narrative context, for example, voice-over is often used in film or TV where you need to convey large amounts of information in a limited time, often to establish details that the rest of the story relies on. In the example below from X-Men: Days of Future Past (2014), we hear voice-over, which makes sense of the visuals we are seeing, but that also adds more than the visuals could imply on their own. It is also used to build excitement and curiosity in the viewer and establishes some of the key themes explored in the film.
Having said all this, in the narrative context, I would still only recommend using voice-over in this way sparingly. A generally agreed-upon rule of thumb is “show, don’t tell” when it comes to conveying plot, character or theme. Generally, if you can put across information through visuals alone, it creates a more engaging and enjoyable experience for the viewer than spoon-feeding it to them. With that in mind, here are some thoughts on when voice-over, in the film/TV context, can be a great addition:
- When the information you need to convey cannot be communicated visually. The opening 5 minutes of Dune (2021) is a good example.
- When voice-over is truly the more engaging method of communicating information to the viewer. You could argue this is the case in Goodfellas (1990) (think “As far back as I can remember I always wanted to be a gangster“)
- When voice-over adds something unique and creative that the film/TV show would otherwise lack. Consider the voice-over that introduces “The Dude” in The Big Lebowski (1998)
When considering voice-over in the video context, the principal benefits are the same without the limitations you find in film/TV. Whether it is an advertisement, vlog, tutorial, review or artistic piece, the use of voice-over can be hugely helpful or even crucial. While you may wish to talk directly to the camera for many types of videos, voice-over will be the better choice in a lot of cases. Consider the advertisement below by Sam Kolder, promoting his masterclass. While he does talk directly to the camera in many of his other videos, in this case, the use of voice-over adds a degree of professionalism and production value that complements the video’s purpose.
One of the most powerful features of voice-over is its capacity to breathe life and energy into the visuals they accompany. They do so with the human connection of having a real person talk to you, the audience, throughout. Of all the video creators out there, not many rival Casey Neistat in the ability to creatively combine visuals and sound to craft highly entertaining stories, all with a personal touch and unique style. In the example below, voice-over is used extremely creatively to give the visuals greater meaning. It allows each clip to contribute towards a singular idea despite being so different.
So, having now looked at examples of voice-over in action, let’s summarize the benefits of good voice-over:
- Conveying information
- Adding drama/interest/creativity
- connecting and adding meaning to different components of a video
Now it’s time to talk about how you can go about actually creating voice-over to enhance your own videos.
How to record high-quality voice-over
Let’s work out the process of creating voice-over to make sure your end result does justice to your creativity and that (ideally) you don’t break the bank in the process.
Choosing a microphone
This is a big decision and probably the part of this process that could risk costing you the most money. Fortunately, many budget options exist that still record sound to a good standard. At the end of this article, you’ll find a table outlining some of the most popular options at different price points. In the meantime, we’d recommend taking a read at DJ Pangburn’s comprehensive article on the best microphone choices depending on the kind of audio you need to capture.
Before moving on, however, here are a few of the most important things to factor into your decision:
- Consider the polar pattern of your microphone. This basically refers to the space around your microphone that it will pick up sound from. For voice-over, you will likely want a unidirectional – or “cardioid” – microphone rather than an omnidirectional one. This ensures you capture only the sound in front of the mic (your voice) rather than everything in the whole room.
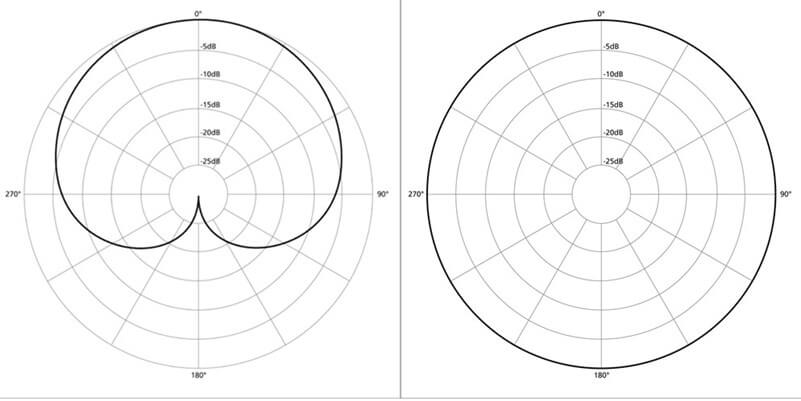
The unidirectional microphone polar pattern (left) is better than the omnidirectional polar pattern (right) for voice-over
- Most mics are either dynamic or condenser mics – what makes one type more suitable than the other could be quite specific to you. Condenser mics are typically considered best for voice-over as they pick up more detail in the voice. Still, at the same time, they can pick up more unwanted sounds from your environment as well. Dynamic mics will be more forgiving here. However, if you have ideal audio recording conditions, your result may not be as rich as a condenser mic in the same situation.
- Studio microphones are most commonly used for voice-over work, though shotgun microphones can also be suitable.
- Think about all the kinds of audio you’ll want to record for your videos, not just voice-over. If you’re on a tight budget, you may find a mic suitable for various contexts to be better than an excellent voice-over mic that’s not great for anything else (like capturing audio on a film set).
Preparing the room
The treatment of the room you aim to record voice-over in will probably make more of a difference to the quality of your audio than nearly any other factor. Perhaps you’re lucky enough to have access to a studio or a soundproof room fitted with acoustic panels. In all likelihood, you won’t, but that’s ok. You can do plenty to a room at no additional expense to dramatically improve audio quality. This can broadly be thought of as a twofold process.
- Soundproofing: This is doing what you can to prevent outside, unwanted noises from entering into your recording. If you are recording in your own house, you’ll hopefully get away with just choosing the quietest room possible, shutting doors and windows and hanging material over them (blankets, rugs etc.). However, if thin walls, noisy neighbors, nearby traffic etc., are serious issues, you may need to consider other recording locations.
- Sound treatment: Unlike soundproofing, sound treatment is concerned with favorably manipulating sound quality within a room (including sound from the intended source). When you begin speaking, a portion of that sound will travel directly into your microphone (direct noise). Still, most of it spreads around the room you are in, bounces off walls and other objects and then enters the microphone (reflected noise). With voice-over especially, you generally want to minimize reflected noise and maximize direct noise for a clean sound. To do this, you could take away hard objects in the room and cover any remaining ones with absorbent material.
When trying to treat their room for sound, some people will completely circle themselves with rugs and blankets or record in a literal closet. While they have the right idea, if there is no reflected noise whatsoever, the recording can sound too flat, unnaturally so. Technically, the best way to avoid this is to invest in sound diffusers, which reflect sounds evenly rather than reflecting just particular frequencies. Short of this, however, you can just play around with the sound-reflective objects you do have in your home and see which contribute to the best overall sound.
Writing appropriate script
Before having fun with the purely technical side of voice-over, it’s vital to think through your script before recording. Stream of consciousness and off-the-cuff voice-over may work for certain types of videos, but as discussed earlier in the blog, voice-over is at its best when it complements and enriches the visuals it accompanies. This is much harder to achieve without planning. Of course, how you go about this will be a unique and creative decision of your own, but here are a few areas to think about.
As helpful as voice-over is at communicating information, you can only really get away with it if it is interesting in itself. Try to write concisely so as not to waste the listener’s time, but also take advantage of the human element voice-over provides to add some flair to your writing.
Since voice-over is made to go alongside visuals, it’s good to write with the viewer’s experience in mind. Since you know the viewer will be both listening and watching, you can let the visuals do some of the talking. In other words, if the visuals communicate something already, then to say it in voice-over too is like repeating yourself. The link below begins with a specific example of what I mean in a brilliant video essay by Nerdwriter (Evan Puschak) on the film Logan (2017). While I highly recommend watching the whole video as it’s a masterclass on voice-over writing in general, this specific example is interesting.
When referring to an approach to superhero storytelling, he says, “I wonder if you can think of a superhero film that might fall into that category” while showing an iconic clip from the Batman franchise. Notice that he doesn’t need to use voice-over to explain that Batman is such a film because he knows the audience will make that connection on their own. This gives the video a real cohesiveness that shows the creator put thought into communicating their ideas.
Delivery
Assuming you are the voice for your voice-over (though, of course, you don’t have to be), you may want to practice how you’ll deliver your carefully written script. From a technical standpoint and in terms of audience reception, you will want to find consistency in your pace and volume. That’s not to say you can’t speed up and slow down or speak louder and quieter for dramatic effect. Still, you want to establish a default pace and volume to return to so the viewer isn’t taken out of the experience by noticing shifts in these things.
Clarity is another area to be conscious of. You want to strike a delicate balance between sounding clear and understandable without sounding like you are reading word-for-word from a script (even though you probably are).
Try to make sure you are in a comfortable position when recording, which should also help with volume consistency, and perhaps the most helpful tip is to practice. Record samples and, assuming you have overcome your voice confrontation, listen back to them and analyze whether you sound natural!
Post-production
In video, you can fine-tune so many variables (exposure, color, framing etc.) that even a bad shot from the camera could become a good-looking shot after editing. With audio, while there are just as many, if not more, fine-tunable adjustments available, they generally rely very heavily on the original recording’s standard. If you have bad background noise, the volume is too low, a lot of unwanted reflected noise or inconsistent volume, you can do things to minimize the prominence of these issues in post. However, you are unlikely to ever get a crisp, clean finished product.
Assuming you do have clean audio, what else can you do to improve it even further?
This isn’t the kind of question that has a one-size-fits-all answer. The kind of editing that your audio needs depends on several factors:
- The microphone
- The environment in which the audio was recorded
- Even the recorded voice.
However, there are a few tools you will likely want to use in your own voice-over to varying extents depending on each of these factors. I would prioritize compressor, EQ (equalizer), and de-esser ,and any mainstream audio editing software will allow you to adjust these elements. The video below from Potato Jet covers these 3 areas excellently with the help of professional sound mixer Alex Knickerbocker.
Recommended audio equipment
As promised, compiled below are lists of the gear and software we would recommend for recording voice-over.
Microphones
Covering a broad price range, all of these microphones come highly recommended. Also, they are generally more geared explicitly towards voice-over recording (or similar audio recording contexts).
| Microphone | Features | Cost |
| Blue Snowball Ice |
|
$59 |
| Rode PodMic |
|
$99 |
| Blue Yeti Pro |
|
$149 |
| Shure SM7B |
|
$589 |
| Neumann TLM 102 |
|
$699 |
Audio editing software
Dedicated audio editing programs really do have a lot to offer. However, you may not need to look farther than the software you likely already have, depending on the scope of audio work you intend to do.
| Software | Features | Cost |
| Audacity |
|
Free |
| Adobe Audition |
|
$20.99/month |
| Logic Pro |
|
$199 |
| Current Video Editing Software |
|
No extra cost |
Portable audio recorders
Another great article by DJ Pangburn covers a lot of different choices of portable audio recorders to make a more informed choice. But for now, the 3 recorders below span a varied price range but are all reputable options.
| Product | Features | Cost |
| Tascam DR-05X |
|
$129.99 |
| Sony PCM-A10 |
|
$299.99 |
| Zoom H6 |
|
$349.99 |
Wrapping up
So we’ve taken a close look at what voice-over is, when to use it and how to produce it. Hopefully, you’ll have the tools and understanding to add it professionally to your next project. Remember to make sure you have done all you can, creatively and technically, to ensure your voice-over maximizes your video’s potential.