The issue of aging and de-aging on screen has always been a challenge for directors. After all, filmmaking is about bringing stories to the screen, and when your story takes place over a long period of time, like from childhood to old age, one of the biggest challenges is how to show the actor aging in a realistic way.
Many directors have tried different methods to solve this issue over the years, and in this post, we’ll discuss some of them. From the early days of cinema when they used makeup through when they just changed actors to motion capture and, most recently, the light capture technology which Martin Scorsese used in his 2019 crime epic The Irishman, we’ll talk about the history of aging and de-aging on the big screen.
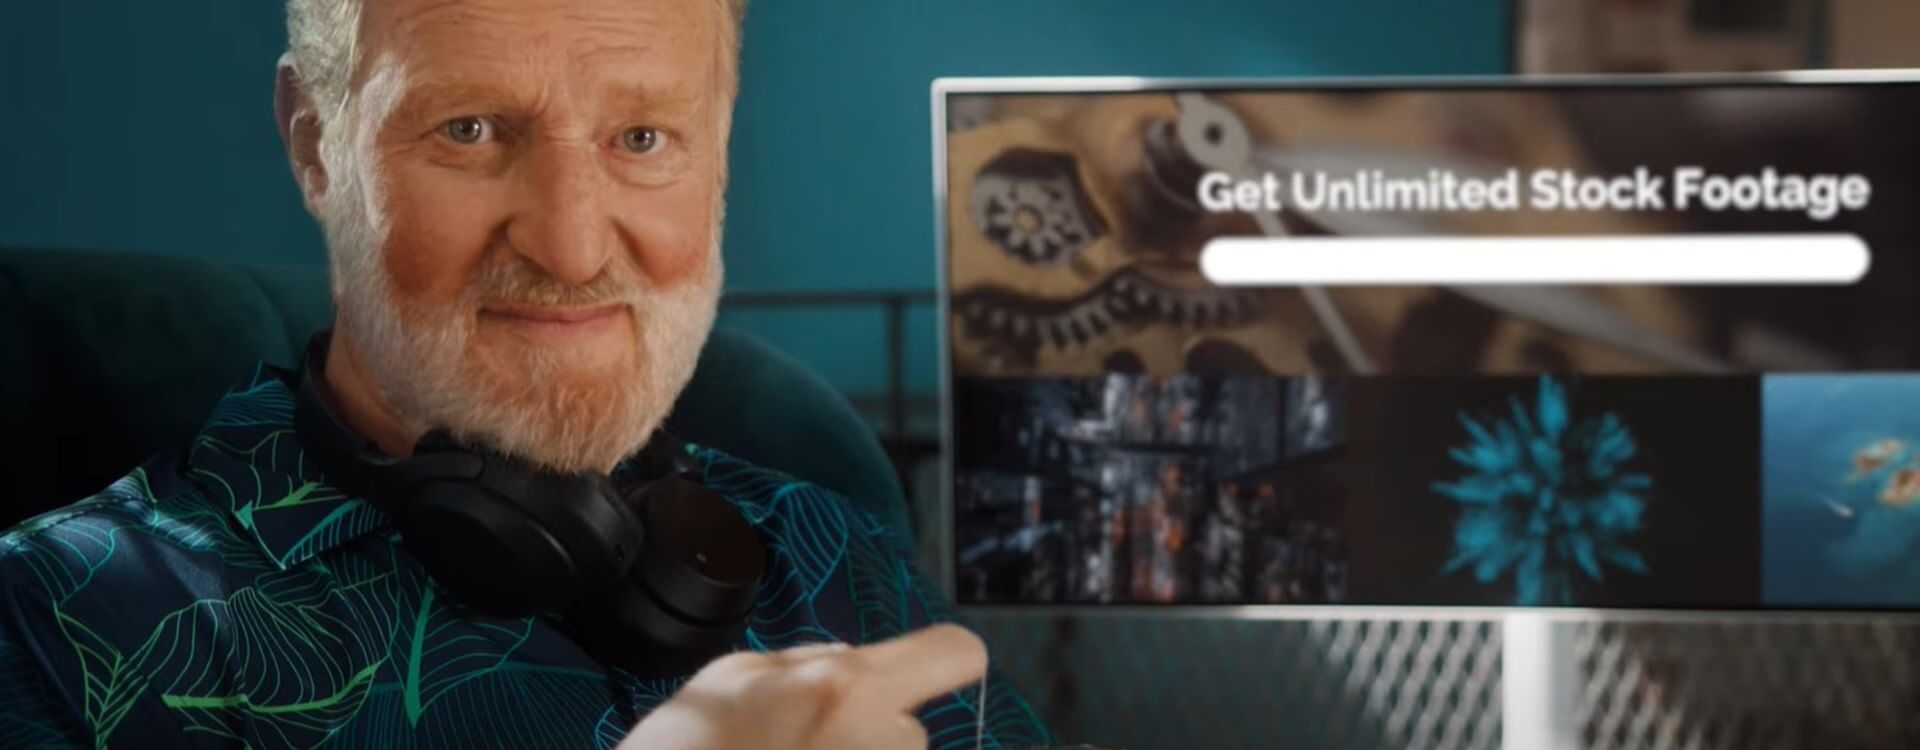
In the end, we’ll talk about you how you can create your own de-aging effect using FaceApp, EBsynth and After Effects like we did in our latest commercial.
Here’s one of the spots:
Now let’s go back in time.
The Karl Struss technique
The key figure in this field during the early days of cinema was American photographer turned cinematographer Karl Struss. When shooting the 1925 silent adventure epic Ben Hur: A Tale of the Christ, Struss developed a technique to show face transformation on film. He applied red makeup to create sores on the characters and used a red filter on the camera to make them disappear.
You can see another excellent example of the Karl Struss technique in 1937’s comedy-mystery Sh! The Octopus.
CGI de-aging
Fast forward to 2006’s X-Men: The Last Stand, where the first CGI de-aging effect was used. The opening scene of the movie shows 20 years younger Professor X and Magneto visiting Jean Gray as a child. To de-age Patrick Stewart and Ian McKellen, visual effects experts used the famed Lola VFX computer program to create a 2D Photoshop-like procedure on photos of their younger selves.
The technology was still in its infancy and it showed.
Benjamin Button and the limitations of motion capture
The next breakthrough in computer visualization occurred in David Fincher‘s Oscar-winning The Curious Case of Benjamin Button from 2008. The story follows the titled character, played by Brad Pitt, who suffers from a condition where he is born as an old man and his body de-ages as he grows old.
The first hour of the film features only a computer-generated Brad Pitt from the neck up attached to the body of different actors who wore blue hoods (more on that later on). No makeup or superimposed photography was used.
The VFX team at Digital Domain faced three major challenges here: one was to make Brad Pitt look older; the second was to show all the little subtleties and special features of his face, and the third was to have sots of his face hold up under all conditions, shot types and expressions, whether he’s in broad daylight, lit at night by candlelight, whether he speaks, runs, cries… anything.
To resolve the issue of digitizing Brad Pitt’s face, Digital Domain based their process on Dr. Paul Ekman’s Facial Action Coding System (FACS), a study from the early 1970s that divided the human face into 70 basic poses or shapes, which can be combined to create infinite possibilities of everything the human face is capable of doing.
Mova Contour
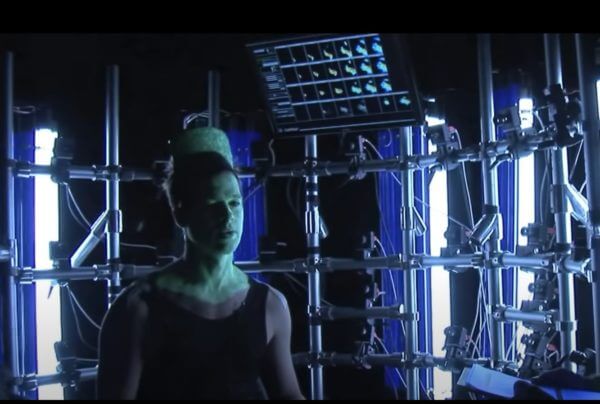
The team used the groundbreaking Mova Contour camera system, which is built as a light-sealed room with two arrays of cameras synchronized that simultaneously record the appearance and shape of a face by using fluorescent makeup Instead of motion capture markers.
Seated in the Mova Contour. Brad Pitt went through all Ekman’s face poses, giving Digital Domain a 3D database of everything his face was capable of doing.
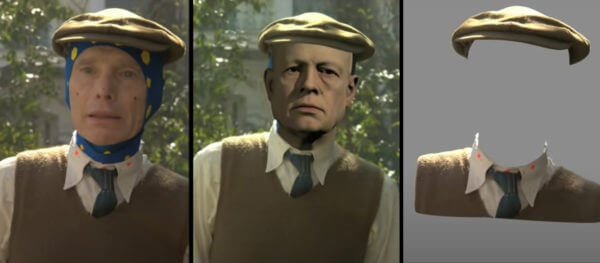
To create Brad’s face in different ages, the team used maquettes made by hyperrealist sculptor Kazu Hiro, which they scanned at a very high resolution and enormous polygonal count. This gave them three age levels of computerized Benjamin, and they “retargeted” the data they had from all the poses 44-year-old Brad did to Brad’s three busts.
For the first hour of the film, they shot the scenes with body actors who wore blue hoods and tracking markers on their heads to recreate the camera motion of the lens optics from the set.
Brad was then brought to a soundstage, he watched the scenes over and over again to get immersed in the film and acted to the images he saw.
The next stage was a process called image analysis, which is transposing the data they had onto 87-year-old Ben and then matching it to Brad’s performance footage in live-action.
To overcome the lighting challenge, they built a lighting system that had the lighting of Brad’s face match the lighting of every single location Benjamin appeared in.
The level of detail that went into the Benjamin Button production was truly astounding, and the team got rewarded with 3 Academy Awards for Art Direction, Make-Up and for Visual Effects.
Gemini Man
The peak of motion capture technology probably arrived in 2018 with Ang Lee‘s Gemini Man starring Will Smith. In the movie, they created a 23-year younger version of Smith using a mix of footage of him from his Fresh Prince and Men in Black days. As with Benjamin Button, the VFX team prepared a database of Will Smith’s facial expressions they shot in a light-sealed room with two arrays of cameras.
They also had Smith play himself on a real-world set and 6 months later had him play his younger self on a motion-capture stage. This film’s production also showed that with all its sophistication, motion capture was still limited in its ability to capture the full depth and richness of human behavior. That’s why the animators studied Smith’s expressions frame by frame, beat for beat and transferred them manually to Will Junior.
De-aging based on light & texture
The latest breakthrough in de-aging came from an unexpected source. If you ask people what comes into mind when they hear the name Martin Scorsese, nobody would say visual effects, and under different circumstances, the director of Taxi Driver and Goodfellas probably wouldn’t have become the catalyst that led to this technological innovation.
The legendary director had wanted for a long time to make The Irishman, a gangster epic that tells the stories of hitman Frank Sheeran, teamsters leader Jimmy Hoffa, and Philly crime boss Russell Bufalino over 51 years, starring Robert De Niro, Al Pacino and Joe Pesci, respectively.
When the project finally got the green light, his trio of actors was too old to play the younger versions of their characters. With existing technologies. Scorsese faced two choices: either use different actors in the film or use motion-capture markers on actors’ faces.
Objecting to either option, Scorsese turned to VFX supervisor Pablo Helman, with whom he was working at the time on Silence, who promised to achieve the de-aging effect without using ‘golf balls’ on actors’ faces.
Flux
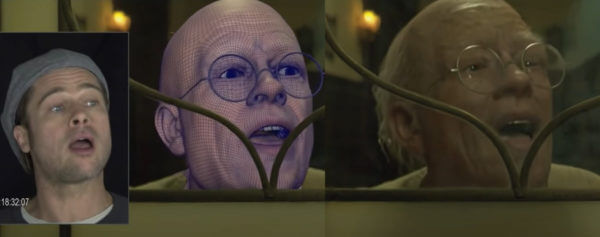
To build the most accurate 3D computer models of the actors, the ILM VFX team built a special camera rig, nicknamed the Three-Headed Monster, that had two ARRI mini witness cameras on the sides of the main RED Helium production camera. These two side cameras were fitted with infrared filters to get evenly lit face footage.
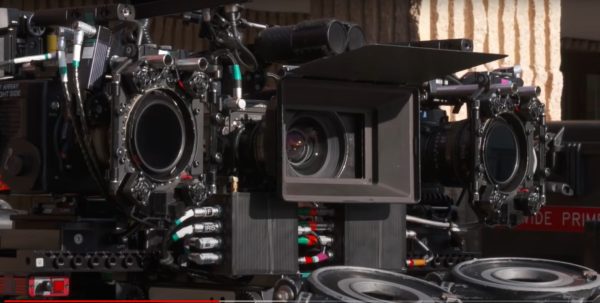
They went through the FACS expressions on a light stage and used a system called ‘Medusa’ to generate different face models that could move from one facial expression to another.
The big breakthrough was the Flux software, which instead of animation, analyzes each scene based on light and texture and creates a 3D model of the actor’s face.
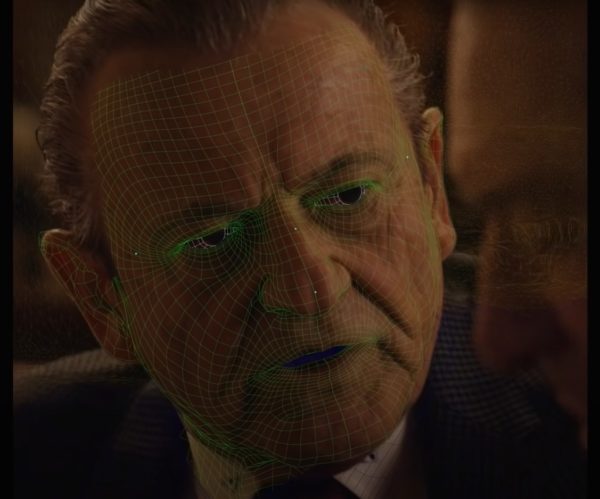
The Flux system would then retarget the younger model to the contemporary actor’s head using the same light and texture technology.
To get the most believable faces, an AI-based Face Finder was built, from thousands of screengrabs of the actors from their films at all stages of their illustrious careers. This database served as a visual reference to see how authentic the model created by Flux was.
The VFX team at ILM was nominated for an Academy Award
The aging effect using FaceApp
Now we will see how you can create the aging and de-aging effect without spending millions of dollars and achieve impressive results.
As mentioned, in our latest commercial we relied on FaceApp’s technology, which, if you haven’t been paying attention, is a photo (and soon video) editing app that can make you look older, younger, change your gender and do more fun stuff. To complete the transformation of our actors, we repurposed a tool designed to turn paintings into video animations, called EBsynth and capped it off with After Effects.
If you want to know more about the production of this ad, watch our behind-the-scenes video.
Tutorial for creating the aging effect
Now let’s get to the aging effect. The workflow included choosing a frame from our original footage and using FaceApp to make our actor older. Then we took that single frame into EBsynth and used it as a reference frame for all the other frames in our video. EBsynth automatically matches and positions the effect in each frame individually and provides a full sequence where the aging effect is applied.
Let’s break down the process even more.
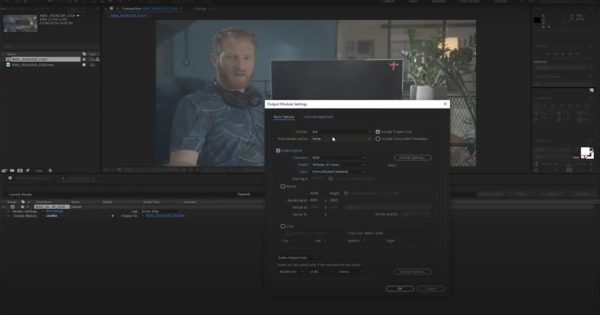
- You need to open After Effects and import your footage.
- Then, you need to create a new compilation out of that footage and export it as a sequence of JPEGs. Make sure everything is organized by creating different folders for your footage and hit Render.
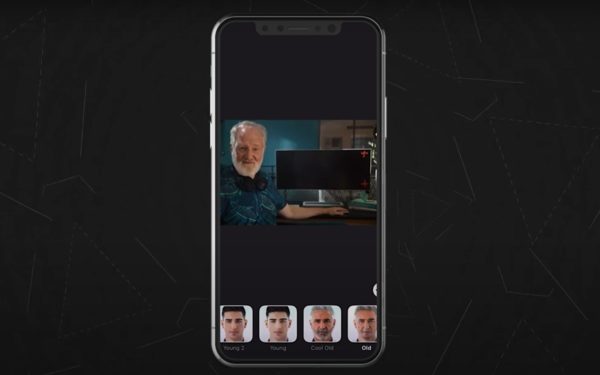
- What you have now is your footage exported as individual JPEG frames. Choose one frame – preferably the one that has the most details of your subject’s face – and download it to your phone.
- Open it with FaceApp and apply the aging filter (or any other effect they have).
- While FaceApp’s aging filter is pretty impressive, the technology (still) works only on photos, so you only have one frame of your video where your subject is older.
- Save that picture to your phone and transfer it back to your computer and if you’d like, tweak or enhance the aging effect on Photoshop.
EBSynth
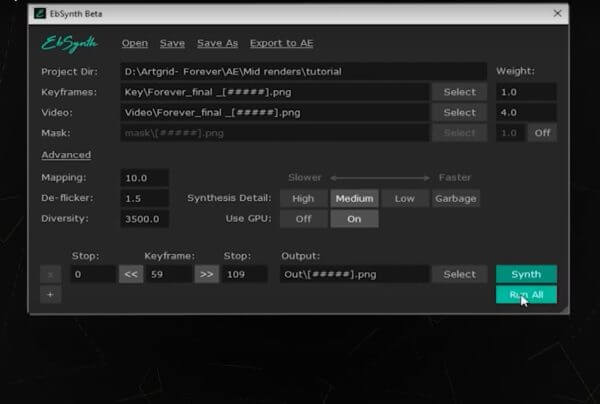
- Name that picture in the same name as the original frame and open EBsynth.
- Click Select and choose the first frame of your JPEG sequence.
- EBsynth will recognize the project directory automatically. Now, you need to import your keyframe – which is the picture of your aged subject created with Faceapp – click Select and choose that frame.
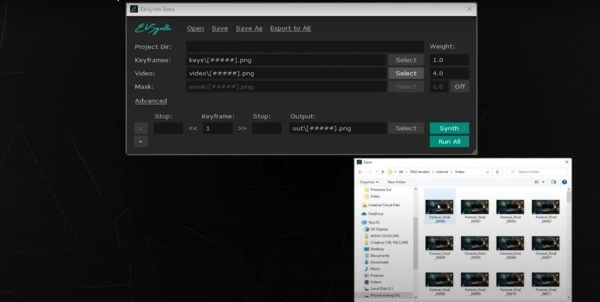
- Now you need to tell EBsynth where the effect should start and end according to the frame numbers of our sequence. Enter the number of the first keyframe where the effect happens on the left and the number of your last frame on the right.
- In the middle, enter the frame number you used on FaceApp.
- To make a smoother effect, click ‘Advanced’ and enter a value of around 1.5 in the De-flicker section.

- Then click select and choose the folder you want to export the effect to. Click ‘Run All’ and let the software work its magic. Take into consideration that this could take some time.
- When it’s done, Import your new sequence to After Effects and align your original footage with your new footage.
- Just animate the opacity of your footage, and you’re all done.
Here are some pro tips that will help you get even better results:
- Mask out the eyes and mouth, which are areas that the software sometimes struggles with, and add sharpness and grain to blend the effect even more with the original footage.
- For a smoother transition, create a Luma Key transition by using the levels effect in ‘Animate It’.
- Alternatively, you can use the newly launched FaceApp video effect feature.
That’s a wrap
Like with every new groundbreaking technology, de-aging does present some philosophical and moral dilemmas, but they are out of the scope of this post. Hope you found useful information and tips for your next video project. Until next time, stay creative!