
In the world of photography, there’s a lasting debate about which lenses are better prime lenses or zoom. In our opinion, it really depends on the type of photography you’re into and the shot you want to capture.
When you consider still photography, it’s easy to choose – if you’re shooting live action or fast-moving objects, use a Zoom lens and still objects like portraits or products, then a prime lens is better.
However, when it comes to film photography, it’s often a matter of personal preference, the level of preparation you’re willing to do, and how intimate you want the shot to feel. We recently worked with a freelance cinematographer and YouTuber, Thomas Kavacic, on this video where he breaks down his 6 top tips for filming with prime lenses.
Thomas has been shooting on prime lenses consistently over the past couple of years, and in his own words, he’s “made a lot of mistakes, but I’ve also learned a lot’. Read on and watch his video to learn more about his experience and how to master the craft of shooting with prime lenses.
6 tips for shooting with prime lenses
1. Build a kit
When starting to build out a kit of prime lenses, you need to consider which focal lengths you want to shoot with and find a good balance of cost, size, weight, and aperture speed. Primes are generally smaller and more compact compared to zoom lenses. So, use that as an advantage.
Prime lenses can also feature really fast apertures. And in general, the faster the lens, the more expensive, heavier, and larger it can be. The sensor size you’ll be shooting on will also impact your decision. If you’re shooting on a crop sensor, you might be leaning towards wider lenses. But if you’re on a full-frame sensor, you might want to choose some standard focal lengths.
If you can, it’s best to cover the three main categories when picking up your focal lengths: wides, mediums, and tights. To cover these three main categories, there are two different kits that are pretty popular amongst filmmakers.
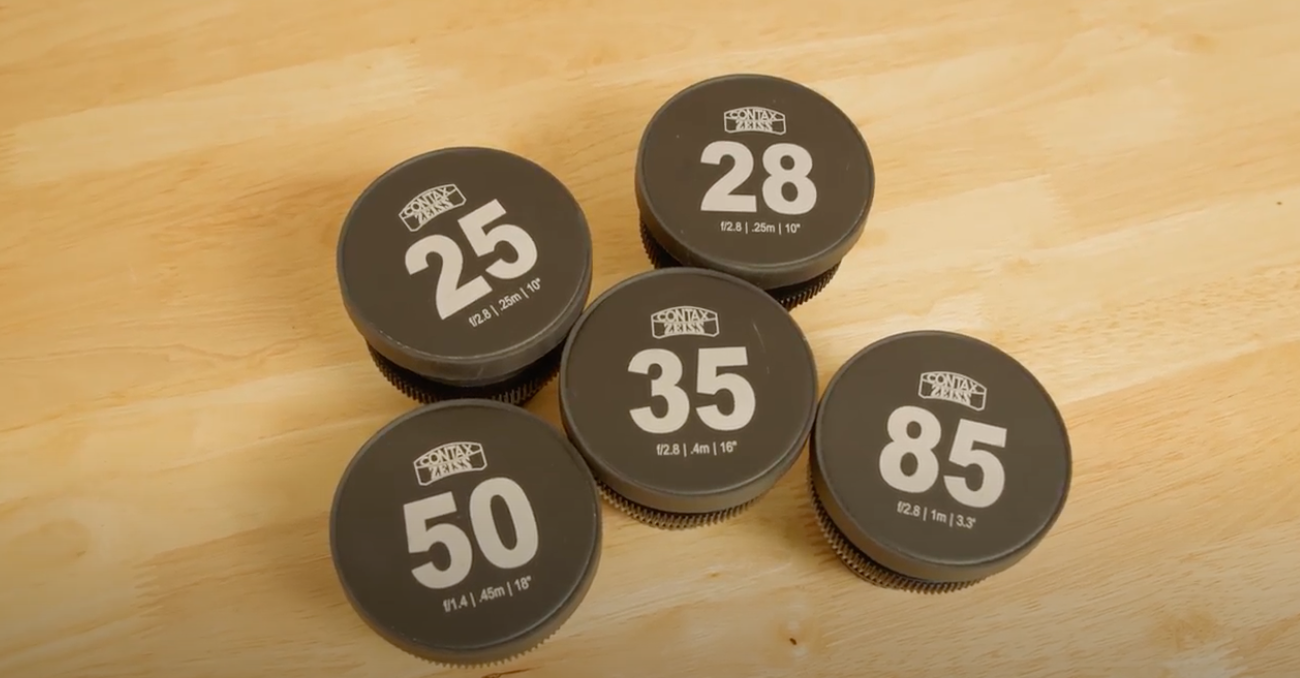
Kit number one consists of four lenses: 24, 35, 50, and 85. With this lens kit, you get your really wide, standard wide, medium standard, and then entry-level telephoto. Thomas shoots the majority of his projects with just these four lenses. And the 24 and 85 definitely get less use than the 35 and 50.
Kit number two consists of three lenses, and that kit has 28, 50, and 85. 28 is nice because it’s in between a 24 and a 35. So it has a very unique feel to it. And a 28 combined with the 50 is a really good one, two punch. And then having that 85 for close-in telephoto shots is just nice to have there.
So, if you’re not really sure what kit to build out, Thomas recommends looking into either kit one or kit two, depending on how many lenses you want to buy.
In general, as long as you have a solid, well-rounded kit of primes, you’ll be setting yourself up for success. And that is extremely important because shooting with primes, we just don’t have that convenience and variety that’s naturally built into zoom lenses.
2. Plan ahead
Planning ahead in any sense is going to give you a better foundation for success versus just rolling up to set and trying to figure it out there. Since prime lenses have a slower innate nature of workflow compared to zoom lenses, and you won’t have that convenience of zooming in or out, you’ll need to be more intentional with your shot selections.
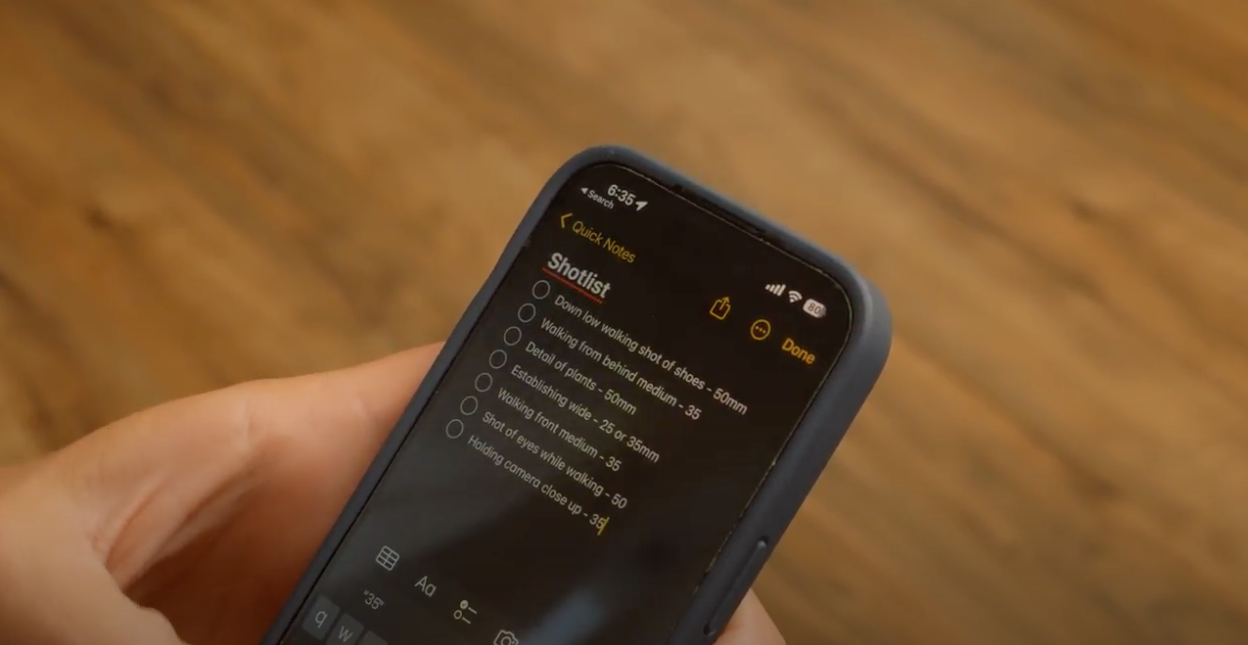
Thomas recommends writing down a shot list with the ideal focal length next to it. So then you can visualize and see how many lens swaps you’ll actually have to make. And if I see that there are tons of lens swaps back and forth in the same scene, you can reorganize shots.
But there are certain times when it’s run and gun, and you don’t have the luxury of starting and stopping all the action. In those cases, you’ll just have to either commit to your lens or commit to lens swaps, which is just kind of the name of the game.
So having a simple shot list or, at the bare minimum, even just thinking about the types of shots and focal lengths you want to be shooting at is going to take away so much stress. When we’re on set, the last thing you want to do is scramble around and try to figure out what focal lengths you need to be shooting at.
You’ll end up wasting time doing too many lens swaps and probably end up missing a lot of shots that you would have gotten if you were a little bit prepared ahead of time. Any type of pre-production to make your life easier on set, especially when working with primes, is going to be well worth the investment.
3. Move around when you’re shooting
When you’re shooting on primes, you are locked into one focal length at a time, which is often viewed as a downside, but you can definitely use that to your advantage. You need to move around the scene and use your arms and legs to help find variety in your angles. Moving around the scene allows you to be a part of it. You feel more intimate as a filmmaker, and the audience feels more intimate with the footage that you’re capturing because you’re inside of the action instead of zooming in from far away.
Thomas says, “One thing that I found useful is trying to imagine the entire scene through one focal length. So I visualize the wides, mediums, and tights and how they can look. Just because I have a 35 on my camera doesn’t mean I can’t get mediums and tights without one lens.”
Instead, you can step in really close, and if your lens has a close minimum focusing distance, you can get some really unique and interesting mediums and tights with a 35.
If you were using a zoom lens, you’d most likely have zoomed in to 50 or 70, which gives a very different look than a 35. You have a chance to get more creative, and you might be surprised by how versatile one lens can be if you physically move around the scene.
4. Slow down your aperture
Most primes are extremely fast, and just because your prime opens up to a crazy aperture doesn’t mean you have to shoot every single shot at that one f-stop. Just like how there needs to be the intention with picking your focal lengths, you need to have intention with your f-stop too.
You should think about what you want your depth of field to look like. How much do you want in focus? Are there multiple subjects? Are you shooting an interview? Landscape?
When you have your aperture wide open, the depth of field is super shallow, it’s really hard to pull focus manually, and when you’re shooting interviews, the eyes may be in focus, but the nose might not be in focus, and it’s not ideal for a lot of scenarios. Shooting with a deeper depth of field will allow you to tell more of the story. When you’re shooting completely wide open, the background is usually a really creamy and blurry mess, which, yes, looks good, but there needs to be intent with that.
We need to give context to the setting, which helps bring the story along, and sometimes shooting a little bit more stop down, allowing the background to be a little more in focus, can do a lot of good compared to shooting fully wide open all the time.
Don’t fall into the trap of shooting completely wide open on these lenses. Give yourself some variety by shooting at different apertures.
5. Use accessories
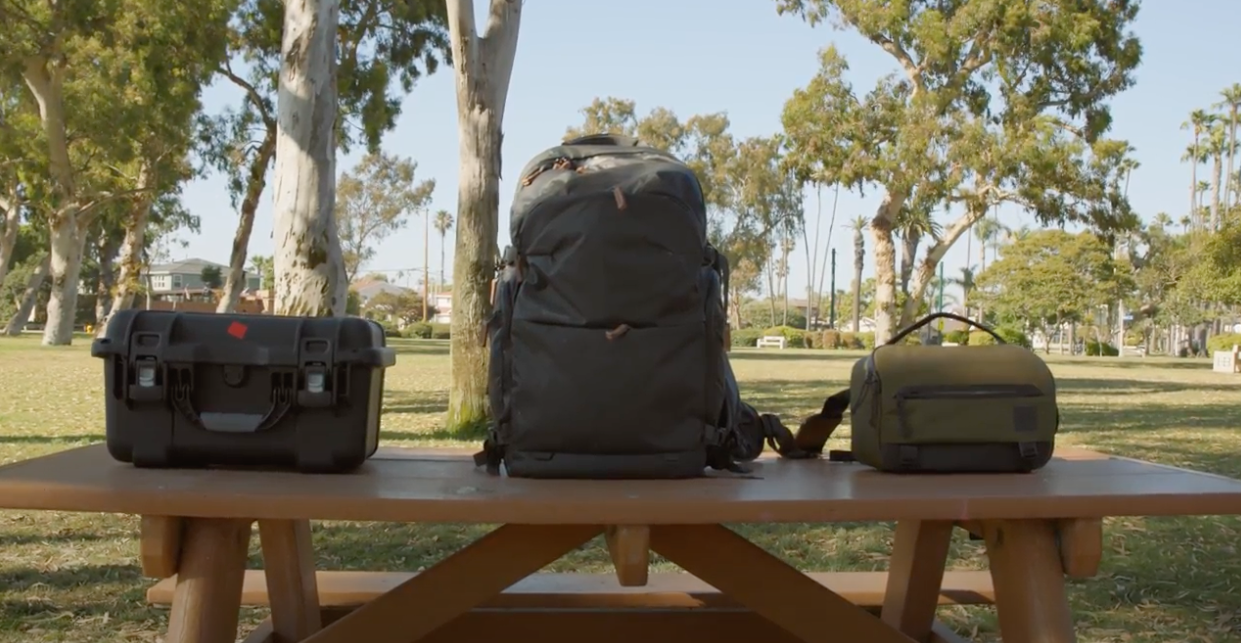
You’re gonna need some accessories. The most important, in Thomas’s opinion, is a bag, case, or a large sling. These will help you carry your lenses and keep things neat and organized when you’re out on location. He recommends having at least one of each because you just never know what you’ll end up needing for a project.
Alongside that, since you’ll be swapping lenses quite a bit — you’re opening up your sensor and your lenses to all of the elements, dust, moisture, dirt, sand, you name it. So one of the most pivotal accessories that you need to get for yourself is a rocket blower to remove dust.
Thomas says, “I take this thing literally everywhere, even if I’m just going out to film for a little bit, and I’m not even shooting on primes. Every time I swap lenses, I try to make sure I hit both lenses, the current one and the one that I’m swapping to, and my sensor, just to make sure everything is neat and clean. Because when you’re shooting with dust on your lens or sensor, that can pop up into your footage, and it is a pain to fix.”
Lastly, you’ll probably want some step-up rings. Step-up rings allow you to take the diameter of your lens and go up to a larger diameter. We always recommend buying the biggest filters possible so you don’t have to buy different sizes of the same filter for each lens.
“For me personally, I buy everything at 82 millimeters, and all my lenses go from 55, 72, 77, 67, and I have step-up rings for all of those that go up to 82. So I just have one set of filters that I use across the board, and I’d rather buy a $30 nice step-up ring than a bunch of $150 filters just to fit on each lens.”
6. Practice, practice, practice
Lastly, you’re gonna need to practice in order to get familiar with the workflow of shooting with primes. Go out and shoot anything, landscapes, details, yourself, your friends, legit, anything. Just get out and spend some time shooting.
With this practice that you’ll be doing, you’ll be primarily targeting the growth within the workflow of shooting on primes. Because Primes are naturally fixed to their focal lengths, you need to learn how to swap lenses, when to swap them, how to swap them efficiently, how to store them and practice the entire backend workflow of carrying the prime lenses.
You need to be intentional and know when to pick lenses for the right shot. There’s so much that goes into it, and there’s a lot of intentionality and planning that has to go in before you even walk into the set. But it’s very different to think about how to shoot on primes versus being there on set and actually seeing it go down. You’ll make tons of mistakes early on, but the more time you put in in that low-pressure personal environment, where yeah, you’re trying to challenge yourself to have a smooth and quick workflow. Be familiar with your gear before you step on set for that client job. And who knows, you may love the convenience of zooms right now, but once you start shooting on primes, you might be drawn towards that slower, more intentional workflow.
With all these tips combined, you should find yourself having a smoother and faster workflow when shooting on primes. And because of that, you’ll be making better videos. But on top of all these tips, there’s another incredible resource out there to really take your videos to the next level.
Thomas used lo-fi chill beats and songs from the carefree mood genre throughout his video.
Listen to Artlist’s lo-fi chill beats and carefree songs here: