
Some important terminology
Before jumping into the technical explanations, we should first establish some important terminology that will help make sense of them:
Encoding
Encoding is the name given to the process of changing a file from one format into another (compression involves encoding to reduce the video’s file size). The 2 components you are adjusting in the encoding process are codecs and containers.
Codec
A codec (coming from merging the words coder and decoder) is a piece of software that enables the conversion of files. Some popular codec examples include H.264, ProRes 422, and ProRes 422 HQ.
Container
A container is a wrapper (you can think of it like an envelope) in which the final video is presented. Popular containers include MP4, MOV, and AVI.
Bitrate
When talking about compression, it’s vital to understand the role of bitrate. Bitrate refers to the amount of data within each second of video, normally measured in megabytes per second (Mbps). As you might expect, video bitrate significantly impacts file size as it determines the information contained within the video. However, this also significantly impacts quality, which you will read more about shortly.
Tips for compressing your videos
So, before going through your own compression workflow, there are a few tips to keep in mind to help guarantee the best results.
1. Shoot footage at the highest possible codec and container
The goal of compression is to manage the size of your final video without impacting the quality. However, we don’t suggest shooting in a compressed format, as this will limit your video’s quality.
Also, since the efficiency of your NLE depends more on codec type than on file size, shooting in compressed formats won’t necessarily help you edit faster. For example, RAW (a very uncompressed format) edits faster on most NLEs than H.265 (a compressed format), even though its file size is significantly larger. You can learn more about it in our article about video formats.
2. Choose H.265 for uploading online
For many years, the H.264 codec was considered to be the best option for uploading to platforms such as YouTube and Facebook. This format is still a great choice, as it’s well-optimized to maximize quality while minimizing file size, which is crucial for reducing your upload speeds and streaming smoothly.
However, a newer codec, H.265, is gaining popularity amongst professionals for being faster and using less storage space. At the same time, faster computers that can handle editing H.265 are becoming more accessible and commonplace. H.265 is quickly becoming the new standard codec. If your computer can handle it, it’s the best choice.
3. Preserve bitrate over resolution
If you shoot your videos in 4K or higher, uploading the final product in anything less can feel upsetting. The truth is, however, when it comes to video quality, it’s your bitrate that will likely make the more significant difference.
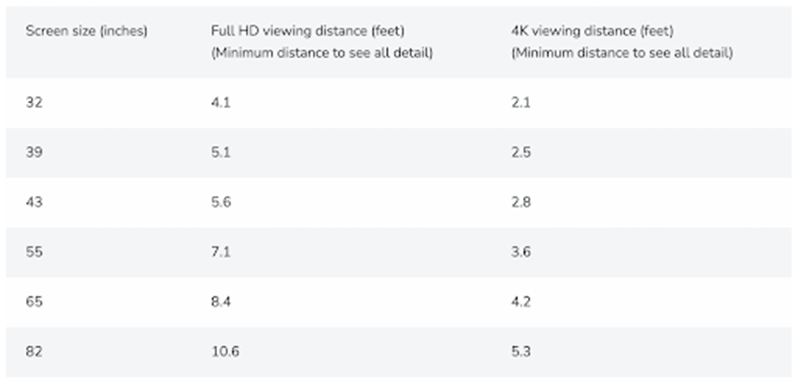
First, consider that most screens (computers/laptops/TVs/phones), even now, are still 1080p. So most viewers on most devices won’t even be able to view your 4K video anyway. Second, because of a concept called “visual acuity,” which refers to the limit of the human eye to recognize the difference between 2 points (in our case, pixels), you may not be able to interpret the difference even on a 4K screen. Photographer Paul Maguire calculated that for our eyes to recognize the benefit of 4K over 1080p, you would have to stand closer than 4 feet (~1.2 meters) away from a 32″ screen.
Bitrate, on the other hand, refers to the amount of information carried within each pixel. If this is interfered with too much, a significant difference in quality can be noticed. In the example below, both versions of the clip were compressed from 4K to 1080p, but one was exported with a high bitrate and the other with a low bitrate. The difference in quality is especially noticeable in the banding, where the lower bitrate version struggles to provide graduated color/luminance, even though both clips have the same number of pixels.
4. Choose a variable bitrate if possible
Choosing a variable bitrate allows you to reduce bitrate in the portions of your video where a difference in quality won’t be noticed (e.g., a black screen or shots with less detail and movement) but increase it to the recommended level in portions where it will be noticed. This results in a smaller file size with no noticeable difference between it and a high-bitrate version.
5. Higher frame rates need higher bitrates
Another tip to keep in mind regarding bitrates is that videos in higher frame rates require a higher bitrate to maintain reasonable quality. Since bitrate is measured in the amount of data available per second of video (measured in megabytes per second/Mbps), having more frames means that the Mbps is divided more times, therefore providing less data to each individual frame.
6. The MP4 container is the most widely accepted online
Referring back to codecs and containers, the best container to use for most situations will be .mp4 instead of .mov or others. The main difference between the two is that MP4 is an international standard, while MOV is technically a proprietary Apple format, initially designed for use with Quicktime. While YouTube and other platforms can often accept both formats, they generally recommend MP4.
How to compress your videos
We’ve looked at what compression means and some tips to keep in mind when compressing video files. Now it’s time to look at the compression formats most suitable to you and your needs across most major video platforms.
Note that the steps below assume a minimum desired resolution of at least 720p, a frame rate of 24-30fps, an H.264 codec, and an MP4 container. Again, H.265 is now recommended if your computer can handle it.
If your video’s frame rate is anything higher than 30 fps, a good rule of thumb is to expect a 50% increase in the ideal bitrate. So 1080p at 24fps should be 8 Mbps, and 1080p at 60fps would become 12 Mbps.
Below is a table with the best resolution and bitrate for each video platform and individual guides on how to compress your videos using various NLEs and transcoders. You can adapt each guide according to this table and your own video’s properties. You will also find brief videos that outline each case’s compression process.
Some important terminology
Before jumping into the technical explanations, we should first establish some important terminology that will help make sense of them:
Encoding
Encoding is the name given to the process of changing a file from one format into another (compression involves encoding to reduce the video’s file size). The 2 components you are adjusting in the encoding process are codecs and containers.
Codec
A codec (coming from merging the words coder and decoder) is a piece of software that enables the conversion of files. Some popular codec examples include H.264, ProRes 422, and ProRes 422 HQ.
Container
A container is a wrapper (you can think of it like an envelope) in which the final video is presented. Popular containers include MP4, MOV, and AVI.
Bitrate
When talking about compression, it’s vital to understand the role of bitrate. Bitrate refers to the amount of data within each second of video, normally measured in megabytes per second (Mbps). As you might expect, video bitrate significantly impacts file size as it determines the information contained within the video. However, this also significantly impacts quality, which you will read more about shortly.
Tips for compressing your videos
So, before going through your own compression workflow, there are a few tips to keep in mind to help guarantee the best results.
1. Shoot footage at the highest possible codec and container
The goal of compression is to manage the size of your final video without impacting the quality. However, we don’t suggest shooting in a compressed format, as this will limit your video’s quality.
Also, since the efficiency of your NLE depends more on codec type than on file size, shooting in compressed formats won’t necessarily help you edit faster. For example, RAW (a very uncompressed format) edits faster on most NLEs than H.265 (a compressed format), even though its file size is significantly larger. You can learn more about it in our article about video formats.
2. Choose H.265 for uploading online
For many years, the H.264 codec was considered to be the best option for uploading to platforms such as YouTube and Facebook. This format is still a great choice, as it’s well-optimized to maximize quality while minimizing file size, which is crucial for reducing your upload speeds and streaming smoothly.
However, a newer codec, H.265, is gaining popularity amongst professionals for being faster and using less storage space. At the same time, faster computers that can handle editing H.265 are becoming more accessible and commonplace. H.265 is quickly becoming the new standard codec. If your computer can handle it, it’s the best choice.
3. Preserve bitrate over resolution
If you shoot your videos in 4K or higher, uploading the final product in anything less can feel upsetting. The truth is, however, when it comes to video quality, it’s your bitrate that will likely make the more significant difference.
First, consider that most screens (computers/laptops/TVs/phones), even now, are still 1080p. So most viewers on most devices won’t even be able to view your 4K video anyway. Second, because of a concept called “visual acuity,” which refers to the limit of the human eye to recognize the difference between 2 points (in our case, pixels), you may not be able to interpret the difference even on a 4K screen. Photographer Paul Maguire calculated that for our eyes to recognize the benefit of 4K over 1080p, you would have to stand closer than 4 feet (~1.2 meters) away from a 32″ screen.
Bitrate, on the other hand, refers to the amount of information carried within each pixel. If this is interfered with too much, a significant difference in quality can be noticed. In the example below, both versions of the clip were compressed from 4K to 1080p, but one was exported with a high bitrate and the other with a low bitrate. The difference in quality is especially noticeable in the banding, where the lower bitrate version struggles to provide graduated color/luminance, even though both clips have the same number of pixels.
4. Choose a variable bitrate if possible
Choosing a variable bitrate allows you to reduce bitrate in the portions of your video where a difference in quality won’t be noticed (e.g., a black screen or shots with less detail and movement) but increase it to the recommended level in portions where it will be noticed. This results in a smaller file size with no noticeable difference between it and a high-bitrate version.
5. Higher frame rates need higher bitrates
Another tip to keep in mind regarding bitrates is that videos in higher frame rates require a higher bitrate to maintain reasonable quality. Since bitrate is measured in the amount of data available per second of video (measured in megabytes per second/Mbps), having more frames means that the Mbps is divided more times, therefore providing less data to each individual frame.
6. The MP4 container is the most widely accepted online
Referring back to codecs and containers, the best container to use for most situations will be .mp4 instead of .mov or others. The main difference between the two is that MP4 is an international standard, while MOV is technically a proprietary Apple format, initially designed for use with Quicktime. While YouTube and other platforms can often accept both formats, they generally recommend MP4.
How to compress your videos
We’ve looked at what compression means and some tips to keep in mind when compressing video files. Now it’s time to look at the compression formats most suitable to you and your needs across most major video platforms.
Note that the steps below assume a minimum desired resolution of at least 720p, a frame rate of 24-30fps, an H.264 codec, and an MP4 container. Again, H.265 is now recommended if your computer can handle it.
If your video’s frame rate is anything higher than 30 fps, a good rule of thumb is to expect a 50% increase in the ideal bitrate. So 1080p at 24fps should be 8 Mbps, and 1080p at 60fps would become 12 Mbps.
Below is a table with the best resolution and bitrate for each video platform and individual guides on how to compress your videos using various NLEs and transcoders. You can adapt each guide according to this table and your own video’s properties. You will also find brief videos that outline each case’s compression process.