
Too many people see subtitles and captions as an optional step that they’re willing to skip if they don’t know how or simply can’t be bothered to do it. But the truth is that subtitles are essential for your video content for several reasons.
Not only do captions make your videos more accessible, but they also widen your potential audience by virtue of doing so. On top of that, captions are no longer only for the hard of hearing or international audiences. Today, three-quarters of viewers watch online content without audio, making captions more essential than ever. And a third plus: they’re great for SEO, helping you reach more viewers. An undeniable win-win-win.
Many platforms offer auto-subtitling, but learning to create your own subtitles gives you more control over their look, functionality, and content. Let’s explore how to use Premiere Pro’s dedicated caption workspace to create, design, and export captions.
What is the difference between subtitles and closed captions?
At first glance, closed captions and subtitles appear to be the same; they both have text on the screen to let the viewer know what is being said. However, there are subtle differences, the main one being who they are intended for.
Subtitles
Subtitles display any spoken information; character dialogue, voice-over and narrations. Subs are intended to be a written transcript of your video and are super helpful for language translation and accessibility for those that don’t have audio. Most social platforms now auto-subtitle your videos when you upload them, giving the viewer the option of turning them on and off.
Closed Captions
Closed captions are subtitles with more details; they don’t just transcribe the spoken word but any other important audio information, such as music, sound effects and background noises. Closed captions are intended for those with no audio input, such as the hearing impaired.
Where subtitles tell the viewer what is being said, closed captions interpret the audio world of your video, indicating tone, emotion, and pacing. Subtitles will often be edited from the spoken word to improve the clarity of the message, such as removing stutters, umms, and errs. Closed captions often include these dialogue stumbles to aid anyone that might be lip reading with following along.
How to add subtitles in Premiere Pro
Premiere Pro offers one of the most comprehensive and robust subtitling and closed caption tools across all professional editing suites. In fact, with Premiere Pro, subtitling is so easy it does a whole step for you.
- Edit your video; your subtitles should be added last.
- Go to window> Text; under the Captions file, click Transcribe Sequence.
- In the Create Transcript box, the appropriate audio track from the drop-down.
- Choose the language you’d like to transcribe; you can add multiple speakers if more than one person is speaking in your video.
- Once you’re happy with the settings, hit Create and wait for Premiere to transcribe the video.
- Read through the transcription, making any adjustment to text the Premiere AI has gotten wrong.
- Once the transcription is done, click the Create Captions button at the top of the box.
- In the pop-up window, ensure Create Captions from Transcription is selected and any other settings you wish to use.
- Hit Create, and Premiere will add your captions to the timeline.
- Highlight all of your titles and use the Essential Graphics panel to adjust the subtitles’ font, weight, size and color.
How to add closed captions in Premiere Pro
Fortunately, adding Closed Captions to your videos in Premiere Pro uses the same method as the Subtitles, but you may need to do a little more editing. Premiere doesn’t allow for 2 Caption Tracks, and since the transcription will only include the spoken words, you will need to go through and add in any other audio information you deem necessary.
There are 2 ways to add a new caption that isn’t created through the transcription; as a part of the original subtitle or a new title.
Option 1: Adding a caption to an existing subtitle
- Find the Subtitle in the Text panel that you want to add an audio description.
- Right-click on the title and choose Add New Text Block to Caption.
- Type your audio description into the new box; it will be added to the transcription titles.
Option 2: Add in a new title
- To add a new title, you must first ensure there is space for it.
- Drag the ends of your subtitles in the timeline to lengthen or shorten them.
- Drag the title element down the timeline if needed.
- When you have enough space, right-click the Subtitle in the Titles Panel.
- Choose Add Caption Before or Add Caption After, depending on your needs; if the title is still grayed out, it means you need more space to add one.
Remember, moving your titles might cause problems with the timing of your dialogue/subtitles.
How to import captions and subtitles into Premiere Pro
If you’ve already got a transcript on hand because you’ve used something like an AI transcription service, you can easily import the file into Premiere Pro. Riverside even has a Premiere Pro integration making it extra easy to seamlessly export your transcription directly into the Premiere Pro timeline.
Regardless of where you got your transcripts, here’s how to import them into Premiere Pro:
- Click Create Captions, then select Import Caption from File
- Drag your .SRT file directly into your project workspace. Premiere Pro will automatically recognize the file format and incorporate the captions or subtitles accordingly.
- You might need to adjust the alignment of your captions with the audio in your project. This can be done by modifying the length of your captions track to synchronize with the audio content.
How to customize subtitles and captions in Premiere Pro
Once you’ve added subtitles or captions to your video in Premiere Pro, it’s time to tailor their appearance to suit your project’s style. Here’s how you can customize subtitles and captions using the tools available in the Essential Graphics panel:
- Font: Start by selecting the caption you want to stylize. Navigate to the Essential Graphics Panel and choose a font that resonates with your video’s aesthetic from the drop-down list. You can fine-tune the font size, adjust paragraph alignment, and even tweak the spacing between characters to achieve the desired effect.
- Position: If you’re looking to experiment with caption placement, head to the ‘Align and Transform’ options. Here, you have the flexibility to adjust where your captions appear using the ‘Zones’ box or by manually inputting your preferred horizontal and vertical positioning.
- Appearance: Go to the ‘Appearance’ section in the Essential Graphics panel to modify aspects such as color, thickness, background, or shadow to align with your video’s theme and mood.
- Animation: Add a dynamic element to your captions by incorporating animations or effects. Transform your captions into ‘source graphics’ by navigating to Graphics and Titles > Upgrade Caption to Graphic, allowing you to infuse motion and visual interest into your subtitles.
- Setting styles: Streamline your workflow and maintain consistency across your captions tracks by creating a caption ‘template’ or track style. This allows you to save your preferred settings, including font, alignment, and color, for future projects. By applying a track style to one caption, you ensure uniformity across all captions on that track, saving time and enhancing visual coherence.
How to export captions and subtitles from Premiere Pro
When you export your video with subtitles, they are burned into the composition; they can’t be turned on/off by the viewer. Additionally, as platforms such as YouTube offer an auto subtitling tool, you can end up with 2 versions of subs on your video, making them difficult to read.
Fortunately, these platforms will also let you upload the subtitles file alongside your video. That way, you get complete control over the titles, but they are still optional for the viewer. Each platform will have a slightly different method to upload these files, but Premiere Pro makes it super easy to download them.
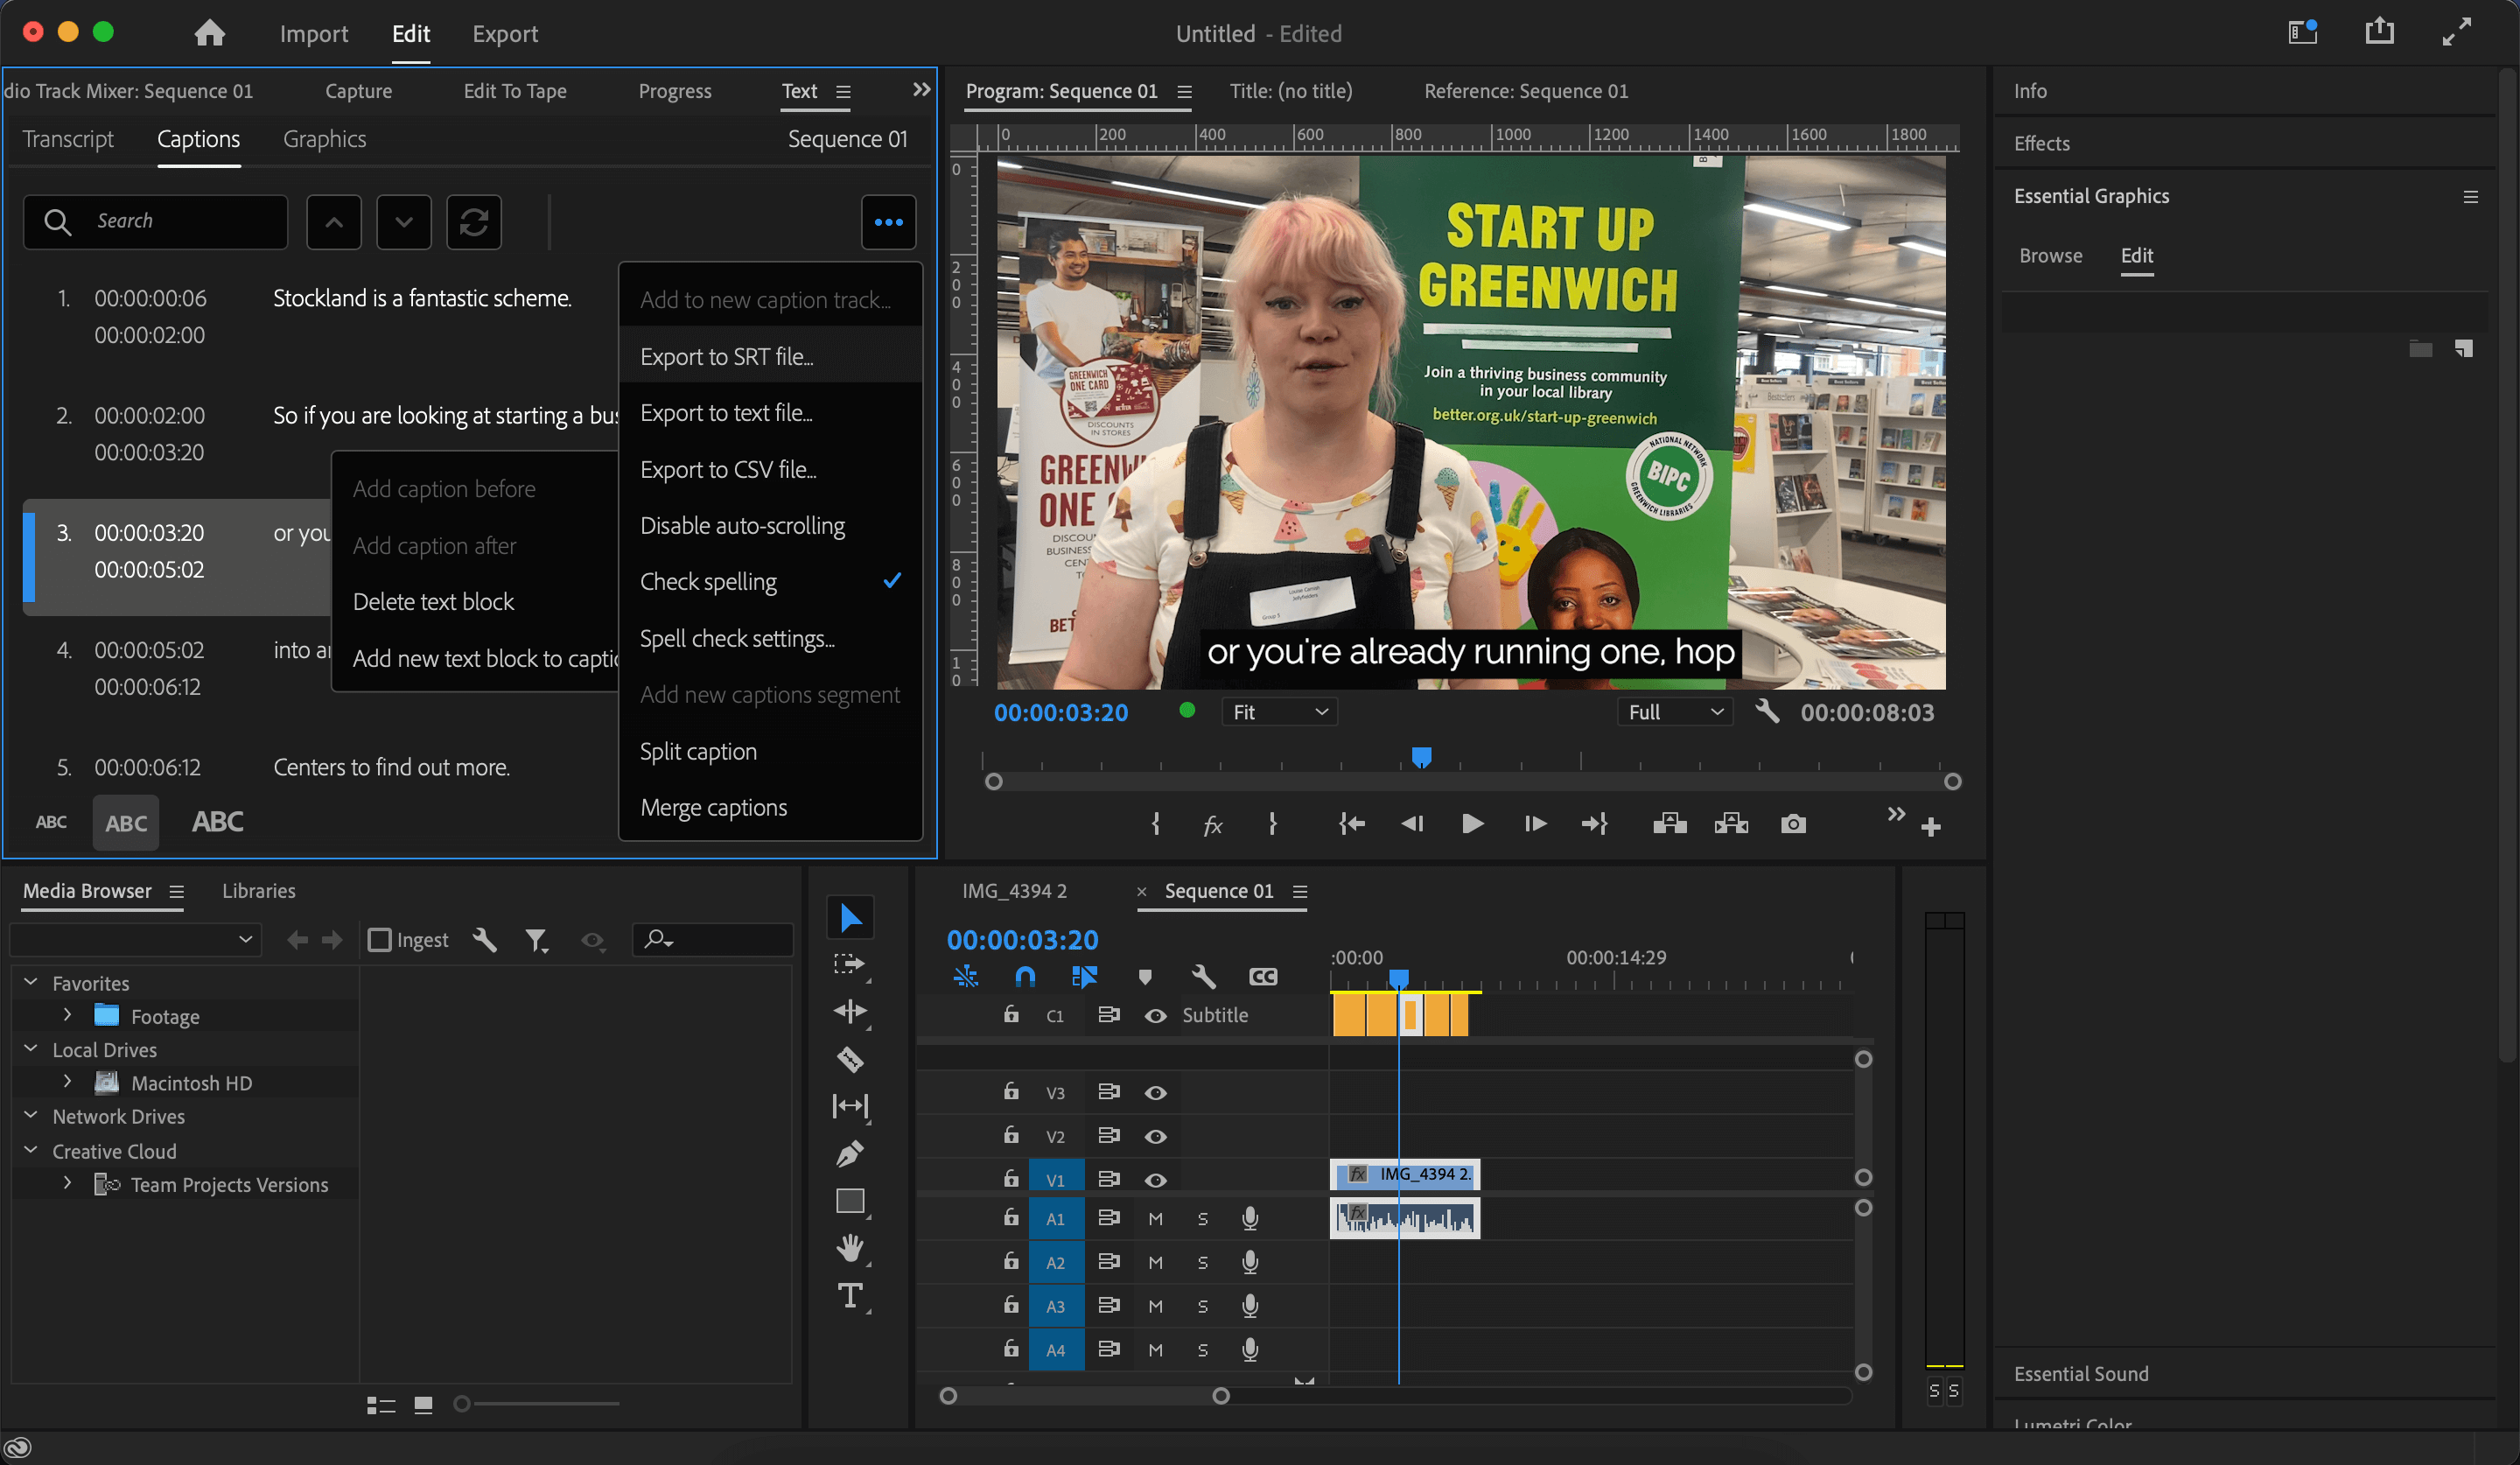
- After completing your video project in Premiere Pro, navigate to File > Export > Media to begin the export process.
- Choose your desired file format for exporting. Consider whether you want to export open or closed caption files.
- Closed Caption Files: Select ‘Create Sidecar File’ during export to generate a separate caption file (.srt, .stl, etc.). These files accompany your video and allow viewers to toggle captions on or off as needed.
- Open Caption Files: Opt for ‘Burn Captions into Video’ to embed the captions directly into the video itself. This ensures that the captions are always visible and cannot be turned off by viewers.
Wrap up
Adding subtitles is a fantastic way of making your videos accessible to a broader audience. Many internet users watch video content without sound, so if your project includes dialogue, Subs are a must. Premiere Pro gives you plenty of control over the look and style of your subtitles, and with the handy AI Transcription tool, it’s never been easier. If you’re looking for more help working with Audio in Premiere Pro, check out this handy guide.